- HubPages»
- Technology»
- Computers & Software»
- Computer Software»
- Office Software Suites»
- Microsoft Office
Outshine Coworkers with these Excel Tricks: Not Normal Shortcuts
The focus of this article is to help you speed up your Microsoft Excel usage time. I taught myself a lot of little ways of moving around in Excel that made my life much easier. You can call them secrets if you want. Really, I just want to make the lives of others easier by sharing these simple tips.
This article is not about those normal Excel short-cuts that you can find all over the Internet. It is not going to go over the many formulas that can greatly benefit you. I will try to make additional hubs to cover those topics someday. Instead, these are “secrets” – things that you don’t usually learn in class, in books, in tutorials, and so on.
These are ways to navigate around a Microsoft Excel worksheet without the use of a mouse. Mastering these tricks will greatly increase your speed in Excel. At first, just like riding a bike, it will take some getting used to, but if you plug away at it, these tricks will come to you like second nature.
You can speed up the time it takes you at work to complete a project by using these tips and tricks, making you a shining star. Most people do not use these tricks, because they do not know them, but if you master them, you will be shocked at how much your Microsoft Excel skills will improve in a short amount of time.

Speed Up Your Microsoft Excel Skills and Typing


The Benefits of Using a Mouse as Little as Possible
- Save Time By Using Excel Right: I had a boss one time that refused to use his keyboard except for typing. Instead, he used his mouse for every action in every the Microsoft Office Suite. When he would try to show me something, my head would nearly explode. Sure, scrolling down 45 pages works, but if you can do it with the stroke of two keys, why would you not want to save the twenty minutes it took you to scroll down all of those pages? Save time learning these secrets!
- Become Fast and Efficient in Excel: I am only providing “some” Excel tips and secrets that are “special.” By “special,” I mean, they are not the easy “Control+c” for “Copy” like most people know, can easily look up, and can find just about anywhere online. I believe Microsoft will even help you print a long list of all shortcuts using the Control button (with which letters and numbers to use). I am just briefly going to go over some awesome tricks in Microsoft Excel that will make you speedy and save you a lot of effort.
- Keep on Learning by Continuing to Teach Yourself Excel: Teach yourself. Again, use the mouse as little as possible. Instead, force yourself to learn a new trick or tip each work day. Hit the ALT button, choose a menu, and pick an option. Then, either write down that short cut you taught yourself, or memorize it. Practice it over and over again until it comes to you like second nature. If you practice one of the tricks I’m going to show you or one you learn on your own daily, you will be shocked within a month with the speed in which you can navigate in Microsoft Excel.

Excel Help - "F1"
Quick Tip: Hit the “F1” key to pull up the Microsoft Excel Help Menu. This short-cut you should know, and if you do not, it is very simple. I don’t think you will need to include it with the other lessons. However, if you feel that the “Help” area is somewhere you frequently visit, and you do not know the quick way to reach it, add it to your schedule of learning activities as one of the lessons.
Master it One Day at a Time
Again, don’t try to learn all of these lessons overnight. Rather, practice and master one a day or one a week. It depends on how hard it is for you to learn it and how often you use it. Do not overwhelm yourself by learning more than you can handle.Wait until you feel comfortable before moving on. Do not attempt to learn a new Excel tip until you have mastered the last one. However, keep at it! Do not give up!

What is So Special About These Particular Excel Tricks?
- These are more than your basic Microsoft Excel short-cuts.
- These are tips that can help you format text in a quick manner.
- These are tricks I have picked up by watching experts flow through Excel.
- These are tools I am sharing from messing around myself and learning.

The Advantages of Becoming an Excel Wiz Kid
- You can do things in Excel much faster.
- With the time you save, you can do other things in Excel or in other programs.
- You can impress and teach others your newly mastered Excel skills.
- You can be a powerful asset to your company. People may begin to turn to you for "Excel" advice, since you have become the Excel pro.
- You will be able to continue to expand your knowledge in these Microsoft Excel skills and tips, teaching yourself even more each day.
- You may be able to take on additional responsibilities at work, impressing your boss, possibly leading to a promotion.

Commitment to Learning These Tips
Can you commit to learn any of these new tips or tricks that you do not know?
My Personal Secrets
Remember that many of these tricks and tips are things I learned by myself over time. Some of them were back with Microsoft Office 2003, so unless followed exactly, the trick I show you will not work. You will have to use the Microsoft Office 2010. Either way is fine - just learn the quick way to get there!

Excel IS Important!
Do not misunderstand:
Excel CTRL+ short-cuts ARE crucial, learning Excel formulas is essential, along with so much more you can do in Excel, and I will try to make more useful articles for those items, but this particular article is something different - things I mostly learned on my own. Things I want to pass along to benefit others.
Become a Master in Excel with Practice
I hope you said yes to the poll, committing that you are willing to devote yourself to learning these tips from these easy lessons, because now it’s time for the real challenge. Here is a step by step schedule to:
- Keep you on track,
- Know what to learn next, and
- Motivate you to practice until perfect.

Keep in mind. If the week ends, and you have not used the trick or tip much, at all, or did not master it yet, you are not ready to move on. If you do not think you will use it, keep the notes handy, but set it aside for now. Go ahead, and move on to a trick or tip that you think you will use.

Note: Unless specified, press down the specified key and immediately lift it up. Do not hold it down while you press down the rest of the keys. This is typically because you are hitting ALT once which brings up the top menu. This is all you need.
Do Not Give Up...
If you are working on learning a trick or tip one week and accidentally forget, and do it the "dinosaur" way, think:
- You need this trick or tip, so it is a good sign you are going to learn it.
- You have yet to master this one, so do not move on to the next one yet.
- Do not beat yourself up; just put a sticky on your desk to remind you of the week's lesson.

Microsoft Excel Lessons and a Weekly Table of Contents
Week
| Lesson
| Lesson of the Week
|
|---|---|---|
1
| Formatting
| Cells
|
2
| Formatting
| Merge and Center
|
3
| Formatting
| Wrap Text
|
4
| Formatting
| Auto Fit
|
5
| Formatting
| Freeze Panes
|
6
| Formatting
| Pivot Tables
|
7
| Columns/Rows
| Highlighting
|
8
| Columns/Rows
| Inserting/Deleting Columns/Rows
|
9
| Columns/Rows
| Height/Width
|
10
| Worksheets
| Moving
|
11
| Worksheets
| Naming
|
12
| Worksheets
| Inserting/Deleting
|
13
| Navigating
| Arrows
|
14
| Navigating
| Home Key
|
15
| Navigating
| Page Up/Page Down
|
16
| Inserting
| Smart Art
|
17
| Inserting
| Charts
|
18
| Inserting
| Text Boxes
|
19
| Inserting
| Headers and Footers
|
20
| Inserting
| Objects and Symbols
|
21
| Spelling and Grammar
| Spelling and Grammar
|
22
| Page Layout, Preview, and Print
| Printing
|
23
| Page Layout, Preview, and Print
| Print Preview
|
24
| Page Layout, Preview, and Print
| Page Layout
|
This is a tentative lesson plan I made up week by week for you. You can of course adjust it to fit your needs and schedule. Just try to stay disciplined, so that you can learn these tricks. It will pay off.

Lesson 1: Formatting - Look Good with Little Effort
Lesson 1A: Format Cells - Hold down the Control key and press the number 1. This will bring up your typical “Format Cells” menu box, and you can learn to navigate through this box like Superman or Superwoman once you learn more about Excel.
Lesson 1B: Merge and Center: ALT, h, and m. Then press Enter.
Lesson 1C: Wrap Text: ALT, h, and w. Then press Enter.
Lesson 1D: Auto Fit (cells, rows, or columns)
- Auto fit contents neatly into current cell: ALT, o, c, and a.
- Auto fit row height: ALT, h, o, and a.
- Auto fit column width: ALT, h, o, and i.
Lesson 1E: Freeze Panes: ALT, w, f, and then: f (to freeze or unfreeze where you currently are), r (to freeze the top row), or c (to freeze the first column).
Lesson 1F: Pivot Table: ALT, n, v, t, and “OK.” If you would like to learn more about the basics of a pivot table, please check out this Hubpage:
Make a Simple Excel Pivot Table
- Tutorial: How to Create a Simple Pivot Table in Microsoft Excel
This tutorial walks you through step by step the way in which to create and edit an Excel pivot table. Pivot tables organize data, allow you to view trends, and help you make informed decisions.
Tip: When you see an underlined letter in a box, holding down the ALT key + that letter will give you that desired command.
Note: Holding down the CTRL key with the letter z will “undo” any action you just did.

Lesson 2: Columns and Rows – Make Magic!
Lesson 2A: Highlight – (Highlight a Row): Hold down the shift key and the space bar until it is highlighted, and then lift up; (Highlight a Column): Hold down the CTRL key and the space bar until it is highlighted, and then lift up.
Lesson 2B: Insert or Delete Columns or Rows:
- Insert a Row: ALT, I, and r.
- Insert a Column: ALT, I, and c.
- Delete a Row: ALT, h, d, and r.
- Delete a Column: ALT, h, d, and c.
Lesson 2C: Row Height and Column Width: Row Height (ALT, h, o, h, pick size, and “OK.”) and Column Width (ALT, h, o, w, pick size, and “OK.”).

Lesson 3: Worksheets - Watch Them Move!
Lesson 3A: Move Sheet – This can be a few more steps than usual depending on what you want to do. It always begins with ALT, e, and m.
- You wish to move or copy your current sheet in your same workbook:
- (HOLD ALT) and c = Copy my current sheet
- (HOLD ALT) and b = “Before Sheet” – At this point you can use the arrows up and down to choose what sheet you want your new sheet to be listed in the workbook before.
- If you wish to put a copy of your sheet or the sheet itself in a different workbook:
- (HOLD ALT) and c = Copy my current sheet
- (HOLD ALT) and t = “To Book” – Now you can pick either a “new workbook” or another open Excel workbook – wherever you wish to put the sheet.
- (HOLD ALT) and b = “Before Sheet” - At this point you can use the arrows up and down to choose what sheet you want your new sheet to be listed in the workbook before.
- When all decisions about copying and moving a worksheet have been complete, you can press ENTER on “OK” in order to complete the action.
Lesson 3B: Naming the Worksheet: ALT, o, h, and r.
Lesson 3C: Inserting and Deleting Worksheets: (Insert): ALT, i, and w. (Delete): ALT, e, and l.

Lesson 4: Navigation - The Biggest Time-Saver
Lesson 4A: Arrows – This is probably my favorite trick. It has made me a rock star in Excel.

Arrows
Command
| Action
|
|---|---|
END key and Arrow Down
| Takes you to the bottom cell of a list of data
|
END key and Arrow Up
| Takes you to the top cell of a list of data
|
END key and Right Arrow
| Takes you to the right most cell of a row of data
|
END key and Left Arrow
| Takes you to the left most cell of a row of data
|

Lesson 4B: Home – Take me home! I don’t like where I am in the spreadsheet
HOME = Takes you to the first left cell in a row (data or not).
CTRL (hold down) and HOME = Takes you to the top left cell in a sheet (data or not).
Lesson 4C: Page Up and Page Down – Wow! I did not know how useful those little keys could be until I mastered them.
CTRL (hold down) and Pg Up = Takes you to the sheet before the sheet you currently are on.
CTRL (hold down) and Pg Dn = Takes you to the sheet after the sheet you currently are on.

Note: Holding down the CTRL key with the letter z will “undo” any action you just did.
Important: Save often! This can easily be done with ALT, f, s, and a – choose a location you will remember or write it down.

Lesson 5: Inserting – Endless Possibilities
Lesson 5A: Smart Art – ALT, n, and m. From there, the “Smart Art” menu gives you many options.
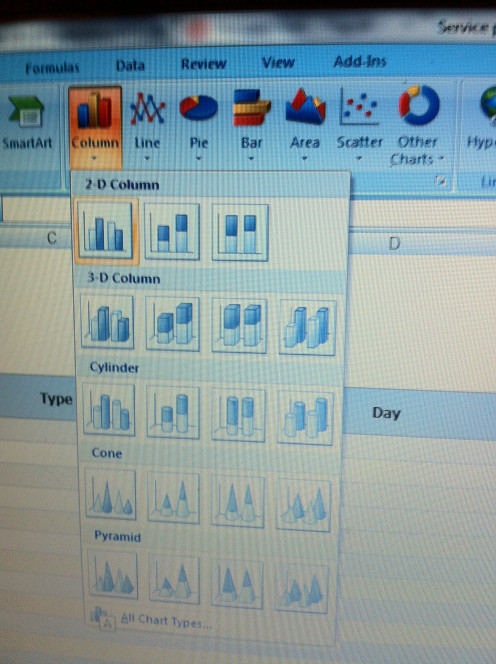
Lesson 5B: Chart – ALT, n, and (c = regular chart; n = line chart; e = pie chart; b = bar chart). The “Chart” menus that will come up (depending on which chart you choose) will guide you through the chart.
Lesson 5C: Text Box – ALT, n, and x. You can use the arrows to choose the type of text box you want. The easiest one to navigate around and to make adjustments with is the basic text box, which means you only need to press ENTER to pick the first one.
Lesson 5D: Header and Footer – ALT, n, and h. At this point, you can just type in the header. To swap over to the footer, press ALT, the letter “J and H” at the same time (for me, this is tricky, so you may want to give the mouse some attention), and the letter “O.”
Lesson 5E: Object or Symbol – (Object) = ALT, n, and j. (Symbol) = ALT, n, and u. I like the symbols personally, because I often need to use © or ™ when writing, especially with research papers. When you use one symbol like ™ more than the others, it will begin to appear as the first option letting you only push ENTER to pick it, rather than having to use the arrows to scroll around to find it.
Inserting a Regular Chart into Excel

Lesson 6: Spelling and Grammar – A Crucial Skill
Lesson 6A: Spelling and Grammar – It is extremely easy! Choose ALT, r, and s. Press enter easily if you wish to ignore Microsoft’s advice. Use the arrows on the keyboard to choose a different word Excel is suggesting. Hold down ALT and the underlined letter of your word choice to choose that option without using a mouse. For example, choose ALT+c to “Change” your word to Excel’s suggestion.

Note: To easily exit out of any open box (menu) that you have popped up, just hit “ESC.”

Lesson 7: Page Layout, Print Preview, and Printing
Lesson 7A: Print – Simple printing can be done with ALT, f, p, and ENTER (on “OK”).
Lesson 7B: Print Preview - ALT, f, p, (Hold) ALT with “w” OR ALT, f, w, and v.
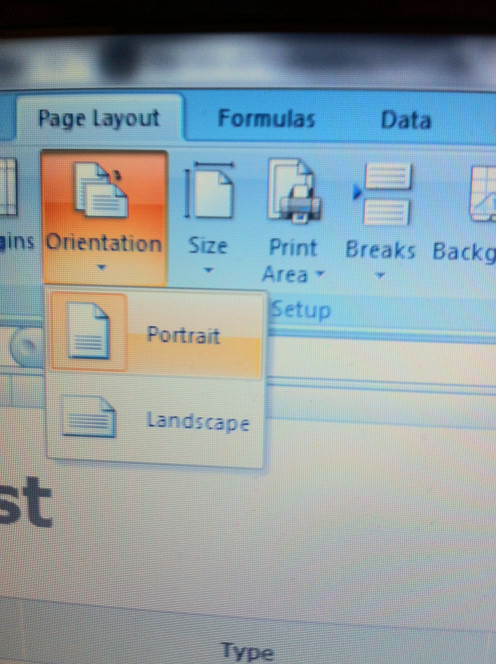
Lesson 7C: Page Orientation/Layout - ALT, f, p, (Hold) ALT with “w” (to get to the preview page) OR ALT, f, w, v (to get to the preview page), ALT, p, Hold Together “sp,” and choose orientation by holding down ALT with “t” and OK (for Portrait) or holding ALT with “l” and OK (for Landscape). A much easier short-cut is ALT, p, o, and arrow to either portrait or landscape, pressing ENTER on your choice.
Page Layout - Portrait or Landscape

How Else Can You Speed Up Your Computer Usage?
My History: I grew up playing the piano, taking typing classes in school, and learning to type the "correct" way. These actually made me a very fast typer. Knowing to type quickly has helped me in life tremendously.
Learn to Type Right: Learning to type with the correct fingers can immensely help you. You should ensure that (1) you know how to type right, (2) you practice typing a lot, making your typing much faster, and (3) before you know it, you will have mad skills to speed up your work performance, give you time to do other things, and impress your colleagues and managers.

TYPING SOURCES:
Typing Master Typing Tutor

Typing Tutor Computer Keyboard Stickers

Typing Web Learning Website
- Free Typing Tutor and Typing Lessons
TypingWeb is a free online typing tutor for typists of all skill levels. TypingWeb's free Teacher Portal also allows schools to utilize TypingWeb in the classroom. However, you can also utilize this website for your own use at home.

Let Me Show You a Few Secrets

I want to reiterate that I am not “teaching” official Excel lessons, standard “short-cuts,” or specific skill sets for an Excel user. Instead, I am teaching you the “tricks” that I have picked up along the way as a businesswoman. These are skills I mastered by watching people who knew their stuff when it came to Excel. I practiced their key strokes until I mastered them. I got to the point where it was second nature. I had to monitor others closely, ask if they’d share their tricks, write them down or remember them (one by one), and then practice them until I was a professional.
So, (1) learn the tricks taught here, (2) try learning from others as I did, (3) teach yourself in the same manner, (4) teach yourself by pressing ALT, looking at what letters pop up at the top showing the menus, select a letter, and continue from there – In other words, make your own ALT+ short-cuts, and (5) when you are ready, learn all of the "official" short-cuts that you can print out or search online on any search engine. Just remember: Don’t give up, and practice makes perfect!

Pictures: The images used in this article came for free from themorguefile.com and as original images from Michele Jones. The dividers were free from 321clipart.com. Finally, the video was original created by Michele Jones.
Hubpages: Feel free to ask a direct question regarding this article in the comment section. If you found this article to be useful or interesting, please feel free to:
- Rate it
- Share it
- Leave me a Comment or Question.
Thanks for Stopping By!


