Making Gel Candles at Home

Making gel candles at home can be a messy task. With that said, you want to make sure you have a place that you can leave your candles and equipment undisturbed for awhile. (kitchen table is generally not a good idea unless you have a dining room where you can eat.) First you will want to make sure you have a well clean area. A pet hair free area is best. Wipe down the counter or table where you will be working. You can get Gel Candle Starter kits at places like Amazon, Wal-Mart and some Hobby stores. Some kits will include a glass container for your candles, but not always. When picking a container for your gel candles, keep in mind that your candles are high temperature. Thin wall glass is a big no-no. If you look at store bought candle jars, you will see that they have pretty thick walls. If you have some old container candles remove the left over candles and reuse those jars. You can also find some good jars and votive glassware that are candle safe at your local Wal-mart. (just be sure to examine the thickness of the walls) Ok, so now you have your starter kit and your containers.
Make sure you have the following before making a candle.
- Gel
- Wicks (perferably with the metal "feet" tab on one end)
- Gel Scent (must have a flashpoint of 170 or higher)
- Dye (optional as a clear gel candle can be just as beautiful)
- Candy Thermometer (should be purchased for this use only, never use for food or candy again)
- Embeds These have to be non-flamable (Some kits may include some sort of embeds that you can place in your candle.)
- Glass Container (make sure the glass is heat tempered, thin walled glass is not adviced.)
Let's Begin
Most wicks now, have 2 sided sticky tape on the bottom of their "feet" metal tab. If yours don't, then with a hot glue gun place a small dab of glue in the center of the bottom of your candle jar. Leave the wick sticking up out of the jar uncut for now.
Remove the amount of gel you plan on using from it's container. Scooping it out in small portions is the best method. (like scooping out ice cream) and place it into a stainless steel pot.
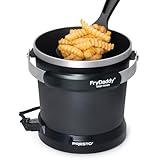
If you are going to be making gel candles on a regular basis, then I suggest you invest in a Fry Daddy for gel candles only. It will make the melting process alot easier.
Melt your gel at a consistent temperature of 200 degrees, until it is a syrupy substance.
Now if you want to, you can add color. Make sure your die is gel candle approved. (food coloring is a no-no) Most dies are concentrated and a very little bit goes a long ways.
A great tip on adding die to a gel candle, use a toothpick. Dab the very tip into the die and then dab the gel. Stir the gel, repeat the process untill you get the color you are looking for.
Now it is time to add the fragrance. first be sure that your choice of fragrance has a Flash Point of 170 degrees or higher. This is extremely important!
[ Flash Point - lowest temperature at which a liquid can form an ignitable mixture in air near the surface of the liquid. The lower the flash point, the easier it is to ignite the material. ]
A gel candle burns at a much slower rate then most other candles, thus the flame of the wick stays in the same place for a longer period of time. This causes a higher heating point. As the gel melts around the flame, it turns into a liquid pool. If you use a fragrance that ignites at a lower temperature then what the flame is creating... Poof! you will have a fire ball.
So please make sure your fragrance (scent) is gel candle approved.
Each gel kit varies on how much scent to add. It depends on the type of gel you are using, and the quantity of gel you are mixing.
Without knowing these facts, I can not tell you how much scent to add. For this step, please refer to your gel candle kit's reference.
Now place your embeds inot the containers if you are using any. Make sure they do not touch the wick. (closer to the outer edges make them easier to see.)
Now it is time to pour the gel into the containers. It is a good idea to warm up the containers a little so the pour will go smoother. Now place your container on a level surface and pour the gel slowly and carefully, try not to disturb your wick. Your wick will move some anyways.
Your candle may aquire a lot of bubbles. This is not really a bad thing. Do not throw the candle away if it has alot of bubbles. You will notice when you go to use it that the bubbles will reflect the candle's flame in sparkly ways. You can experiment with the speed of your pour, the temperature of your gel at pouring time and the temperature of your container to aquire that certain amount of bubbles you are looking for.
Now, if the mouth of the jar is small enough you can use a clothespin to keep the wick pointing up straight until the candle cools. Simply place the clothespin on it's side across the top of the candle. Now pull the long piece of the wick up through the center.
If a clothespin is to short for the jar opening, use a pencil, and wrap the excess wick around the pencil untill it is up straight.
After the candle has cooled, trim the wick to around 1/4 inch.
Now enjoy your candle!

More of my hubs concerning gel candles
- What Are Gel Candle Embeds?
Gel Candle Embeds, What are they? Basically, gel candle embeds are objects you put inside your gel candle for decoration. An example would be a small glass seahorse. There are many things you can use as an... - Gel Candle Embed Tips
Gel Candle Embeds are a great way to make an ordinary Gel candle POP! It grabs people's eyes when they see it. If it is someone who has never seen a gel candle before, they will ask alot of questions. This... - How to Set up Money Making Gel Candle Display Racks For a Craft Fair Show
So you have made it to the point of making gel candles, to where you want to sell them to the public for a profit. Selling your candles is a great way to help pay for the supplies for your hobby. Selling at...


