How to add East Asian Language in your Windows XP Computer

Browsing websites in Asian countries especially in China and Japan based websites was usually a problem of some users. They cannot see the text being displayed in the website instead only squares. This is because their computer was not yet added the East Asian language in its Language settings. Browsing China websites that being set their website language need to activate and install your computers East Asian Language pack to see the text on it. In order to install the East Asian Language you will required having your Windows XP Service Pack2 installer.
Follow these steps to add East Asian Language in our windows XP computer.
1. Insert your Windows XP service Pack2 CD installer in your computer’s DVD or CD Drive
2. If the window “Welcome to Microsoft Windows XP” opens, just close it by clicking the close button. You will not need this welcome window cause you only need to install a small language components
3. Navigate to your computer’s control panel. To go to to your computer’s control panel, click on your start menu, the select control panel

4. Click on Date, Time, Language and Regional Options
5. Select Regional and Language
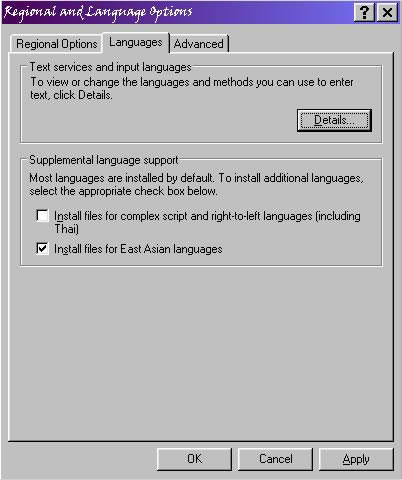
6. Click on the Languages Menu Tab
7. A new Window will pop up. You will need and extra disk space on your hard disk where windows files was installed. Adding East Asian Language was approximately 230 MB will be used in your hard disk space. Click Ok in the popup window, and close it. It was only a notification window.
8.Click OK on the “Regional and Language Options” window to begin the installation. Be patient, as it can take several minutes.
Once all the files have finished copying, a popup window will tell you to reboot your computer to complete the installation.
9.Before you reboot, remove the CD from your CD drive. Reboot your computer.
10.Launch Firefox and browse to the East Asian web site of your choice to test out your new language packs.


