- HubPages»
- Arts and Design»
- Graphic Art & Design»
- Design Software
Advanced 3D Tutorial Part Two
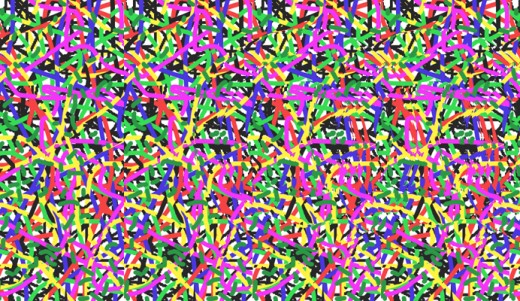
Advanced 3D Project
This is my second in a series of 3D tutorials that can be done at home. It is recommended that the reader have PhotoShop for this lesson, or a similar software program where pieces of art can be copied and pasted at specified distances. The projects herein can probably be done without such software, but it would definitely be a reflection on the artist’s abilities and ingenuity, if successfully done without such.
In my last article I showed some basics and theory for this art form, which I call “Perceived Depth.” I showed how depth can be achieved, but by using straight lines and no curves. If you make a circle that’s larger than the distance the eyes are crossed or diverged, using the method I taught in that first lesson, you will encounter problems with the images around each point on its circumference: The patterns to the left will be at a different level than those on the other side, and the adjusting begins to get complicated.
Therefore, in this lesson I will teach another method to achieve perceived depth. This method does not require that a piece of the art be enlarged or reduced after copying it, like in the first lesson. Instead, each piece will be stepped a certain distance, depending on the depth desired for it. The same theory I taught in the first lesson applies, though: The closer you want something, the less distance it is moved, after being copied.
The first thing to do is to make a panel filled with squiggly lines and patterns. If you’re using a computer to do this, make the lines fairly thick. Hairlines and very small dots are difficult for a computer monitor to reproduce accurately; some will appear smaller than others, even though they may actually be the same size. This will cause your eyes to see “fuzzy” surfaces, or places that may appear to have little hairs or holes in them, where you don’t want them.
The width of this panel should be about two inches, more or less, depending on your ability to cross or diverge your eyes easily. The width of this panel is how far you will be crossing or diverging your eyes. The height of the panel is up to you, but I usually do two or three inches. Step and repeat this panel making about five of them. Use the numeric values in your software program, so that you can assure that each panel is stepped that same space each time. In this case, if each panel is 1.71 inches wide, then the step value would be 1.71". (My sample above, and the Figures for this lesson were made with that size panels, so I will use my measurements as I proceed with this tutorial.)
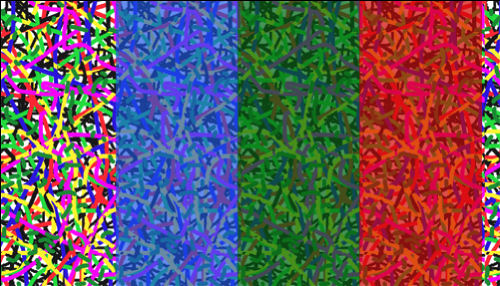
As you make each panel, make an associated panel with a single color, exactly over the top of each panel, starting with the second one. I use these to show how to “cut” each object, as you can’t step an entire object, if it’s larger than the eye-crossing distance (Later on, I'll be explaining this cutting process). These colored panels will be removed when you are ready to print the image for use. You don’t have to make a colored panel for the last one, though. I’ll explain why later. The way I make a colored panel is to click on each side of the new panel I’ve just copied and pasted, and then do an “inverse.” This will cause the panel to be highlighted. I then create a new layer, and use the paint bucket to give this new panel a color. It doesn’t matter what color is used for each panel; I use different colors so I can distinguish one from another. Next, I usually make each panel “transparent” -- to about 40%. This is not necessary, but I do it in case I wish to see something on the layer under it, without having to turn it off. Figure 1 shows a “base board” with four panels and part of a fifth one. (My illustrations have been cropped to save space for this hub.) Also shown are the three colored panels: The first one (the blue one) is in the second position, the second one is in the third, and so on.
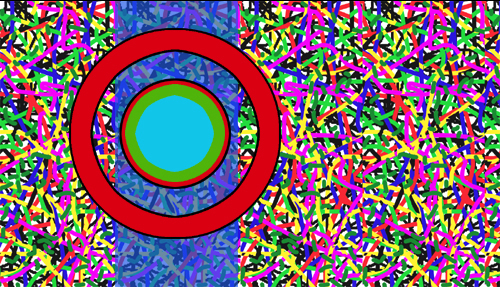
Next, create a new level and draw the object you wish to work with. This only serves as a pattern -- the tool you’ll use to create an outline for copying. Figure 2 shows that I’ve drawn a button with a ring around it. At first I drew it in black, then made a smaller one -- on a new layer -- and painted it red. This is why not much of the black is seen. Next, I made a smaller inner circle (the button), made a new level, and put it on another layer, painting it green. Finally, the smallest blue circle is on the upper layer. These layers represent the contour or form of the image. Note that the ring has only two colors; the black, and red. This means that the ring will be thinner than the button in the middle, and that the center button will appear closer to us than the ring.
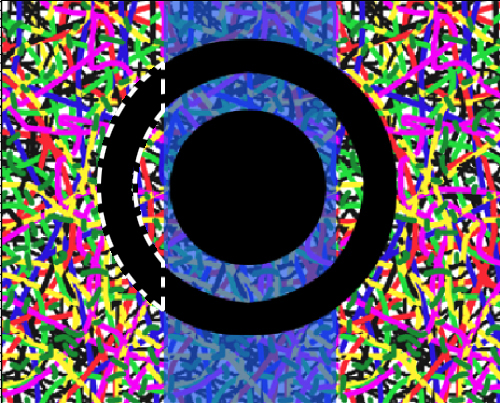
The blue panel behind represents middle section of the image. To the left and right will be the outer sections. Each of these three sections will be copied and pasted separately. In Figure 3, the black image to the left of the blue panel will be the first to be copied and pasted. Except we will not copy the black, but we’ll use it to make an outline so we can copy the pattern that’s beneath it, on its own layer.
Note that in Figure 3, this section is highlighted. This is achieved by going to the black layer of the image, clicking in the ring, then going to the blue layer and clicking in it while pushing the alt (or option) key. This creates a “minus” sign in PhotoShop, which subtracts the middle section of the ring, if you hold the wand over any part of the black image in that section. Next, eliminate the right highlighted section of the ring by clicking in that section too -- with the alt or option key pressed -- on the right side of the blue panel.
Turn off the layer with the black diagram, and go to the level that has the pattern. You should still see the highlighted area above that pattern. If you have a box sitting beside your art table that has measurements, check the x and y coordinates, then do a copy and paste. If you want to check the x and y coordinates of the pasted art, use the highlighting tool (magic wand tool in PhotoShop) and click outside the image, and then do an “inverse.” I like to do this, because sometimes, for a reason I haven’t pin-pointed yet, the pasted object lands crooked. When you’re satisfied that this new object is exactly at the same point as the copy point, then do a step. The width of each baseboard panel, remember, is 1.71. If you step it this distance, there will not be a 3D illusion created. If you step it a longer distance, then you will make a hole in the base board with that shape (when you diverge your eyes). If you use a shorter distance, then you have an image floating above the baseboard. I stepped mine at 1.62 inches.
At this point, step back and take a look at what you have. Not only will you have the left arc of the ring floating in the air, but you’ll also have a hole in the baseboard with that same shape further to the right. Why? Because that same pattern exists in the panel to the right of it, since all panels have the same images. Also, because you stepped that shape only 1.62 inches, then the same pattern to the right is located not 1.71 inches away, but an additional 0.90 inches. Thus, the hole.
You now have to “fill” that hole. This is done by copying and pasting the piece that’s floating in the air. How far do you step it? Well, since the panels are creating a baseboard by being 1.71 inches apart, then you step this floating piece that same distance: 1.71 inches. This will fill the hole. However, there will be a new hole further to the right. So you keep copying and pasting this piece that same distance until all the holes are filled.
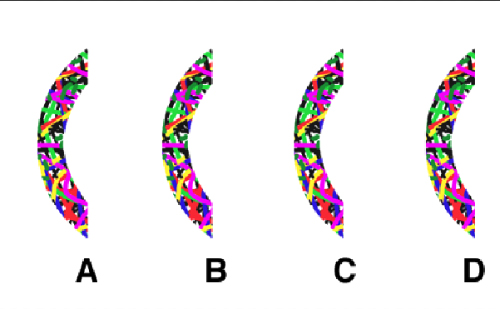
If you turn off the layer with the baseboard, you will see what Figure 4 shows. If you did not make two copies of the first shape, you won’t see the first one, and may not see the 3D affect. In this Figure, Shape A represents the baseboard, untouched; it’s only a representation of what is actually sitting on the baseboard in that position. Shape B is the first one you stepped. It’s distance from A is 1.62 inches. The distance from B to C, and C to D is the 1.71 inches. If you were to test this, you could see that the first one comes out at you, and the others are sitting back, the same level as the baseboard.
Next, it is important that you flatten these shapes before you continue, and make them one with the baseboard layer. If you don’t do this, then subsequent images will be hidden under these shapes, and you will get irregular patterns that will create a cut-up image.
You have two options at this point: First, if you wish to have just a flat object – in other words, if you don’t mind that your object looks like it was cut out of a piece of paper – then you can proceed with the middle part of the object as painted in black, and follow the same steps as previously outlined, then end with the right third of the object and finish in the same way.
But my object is to teach how to give your objects form, so I will proceed with how to do that:
As I said before, the different colors of the object as shown in Figure 2 represent the different shapes, or “altitude” of the various parts of the object. If you know how altitude lines can shape an object, then you can create objects of differing and interesting shapes. In this exercise, the red patterns help to thicken the ring and the button in the middle, the green puts the button a little higher, and the blue rounds it off.
Because we are putting form to our shape, we must complete the left-most section for all levels (all colors) before we start with the next section. In this case, the ring has only two levels, so we need to do only one more series of copying and pasting before we can start on the black part of section 2.
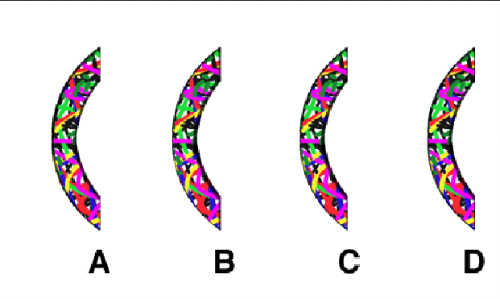
Turn on the red object level, click the ring to highlight it, and subtract the middle and right sections like you did with the black image, using the blue panel. Turn off the red object level, and go to the baseboard level. Do a copy and paste. This time, because this section of the ring is closer to us, the distance we step this piece should be less. I stepped mine at 1.6, which is 0.02 less than the first one. Because this step was only 0.02 less than before, the hole to the right in the next panel will be very shallow. But you can go ahead and fill it anyway by stepping it – you guessed it: 1.71 inches each time. Figure 5 shows these images in relation to the ones made from the black pattern. I darkened the image below to show how the upper layer rests on the lower one (I saved these larger ones to a different layer so I could show you the comparison). Note that the left-most image is sitting directly centered on the darker one below it. But because we stepped it a shorter distance this time, the next image is positioned more to the left of the dark arc below it, showing more dark space to the right than to the left. Each succeeding shape is situated the same way on the ones under them, in order to help them to settle down onto the baseboard. Note that this hole was smaller before being patched, fitting inside the patched hole of the larger pieces. This is why you see “shavings” of patterns growing more pronounced as you look on the right half of all commercial perceived depth images.
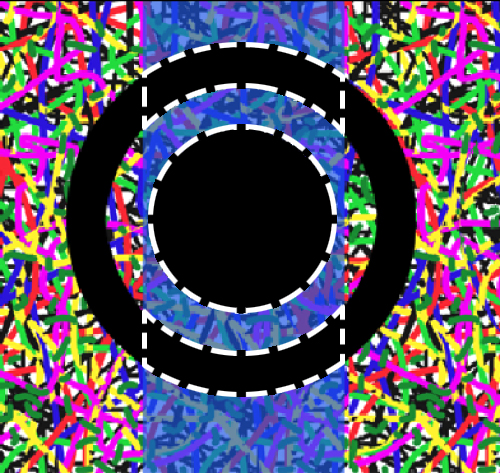
You are now done with the first section. The left arc of the ring now has form to it. You can proceed with the second section now, starting over with the black image. Isolate the middle section of the black pattern by using the blue panel, again, the same way you isolated the left arc (See Figure 6). Go to the baseboard again and copy, using the outline created on the black level. Step and repeat using – again – the one for the black or bottom-most layer, 1.62 inches. To fill the holes, you again use the 1.71" distance.
Staying in this section, go next to the red diagram and isolate the middle section of that pattern. Go to the baseboard and do a copy and paste. This part is, again, the same height as the upper level of the ring, so you would step it 1.6 inches. To fill in the holes, you – of course – use the 1.71 distance.
Flatten the images again, to the baseboard, as always, and go to the green diagram, which is only found in the middle button. This is even closer, so you can step it around 1.57 inches, if you want to bring it toward the viewer rapidly. And to fill in the holes, again you step them 1.71 inches.
With the blue circle, go through the same steps, moving it over about 1.55 or thereabouts, depending on how close you want it. Then fill in the holes and flatten.
You are now ready to work on the last stretch, the right section of the image. This, as in the left section, will only have two levels, beginning, again with the black diagram.
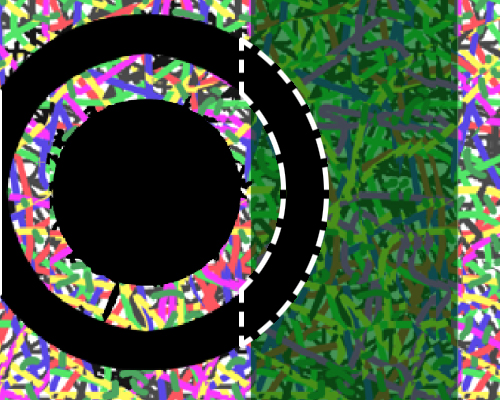
Before we continue, it’s time to teach you about another nuance in perceived depth: At this point, you’ll be copying patterns that have been pasted down from other levels and sections. Because they have been stepped at different distances, those patterns will show an “offset” to the image at the right, when stepped. In other words, if you copy and paste this right half of the ring, and step it far enough to appear level with the middle section of the ring, you’ll see a gap or hole in the ring. If you bring the section to the left in order to fill that gap, then this section of the ring will appear closer to you. To solve this, I refer you to figure 7. Instead of isolating the right half of the ring as defined by the green section, use the rectangle marquee and chop it somewhere to the left of the green panel. It doesn’t matter where you cut it, as long as it’s a distance from the edge of the green panel equal to or greater than the gap that appears. (Look closely at Figure 7, and you'll see that the high-lighted area extends to the left of the green panel.) This solves the gap problem, and you can continue copying and pasting more, to fill in the holes with no problem. When you copy the red pattern, do the same, but chop it further to the left of where you chopped the black pattern.
When you’re done copying and pasting the red, first stepping it at 1.6, then later at 1.71, you’ll be done, and you’ll have an image like the one at the top of this hub.
The reason I specified other panels, like the red one, is in case you have an image that is wide enough to be chopped at the panels left edge or right edges. If the right end your image does not exceed the right edge of the red panel, you actually may not need it; you can chop, using the outside limits of the green panel.
I hope this has been thorough enough for you to proceed without confusion, if you decide to take on this fascinating hobby. If I have not been clear, then please write me and I’ll try to help with whatever problem you have. Have fun in the 2-dimensional manipulation of 3D!j
Below is a link that offers additional help in finding a perceived depth image. It has you focus on the the two squares above the image. Once you have mastered the technique of finding the 3D image, you can easily do the same without having to use the two-squares cheat.
- http://www.magiceye.com/faq_example.htm
The home of Magic Eye Inc., creators of the world-wide stereogram craze of the 90's.


![Baltic Sea Anomaly Details: Is it a UFO or Hoax [video] Baltic Sea Anomaly Details: Is it a UFO or Hoax [video]](https://images.saymedia-content.com/.image/t_share/MTc2MjY0ODM3MjA1MjcxNzI1/baltic-sea-ufo-unidentified-submerged-object.jpg)

