What is a Neutral Density filter?

They reduce the colour intensity equally by reducing the exposure value (E.V) allowing less light to pass through. This means that when using an ND filter, if the shutter speed is kept the same a wider aperture has to be used. Similarly if the aperture is kept the same, the shutter speed has to be reduced to allow more light to pass through.
They are mostly used to create the motion blur by giving the photographer the flexibility to change the aperture and shutter speed. In very bright scenes it might not be possible to create motion blur since it requires you to open up the shutter for a longer period, the ND filter will help you achieve motion blur in such situation without over-exposing your image.
As discussed above, ND filters will use a wider aperture since you need to compensate for the reduction of light by the filters itself, having a wide aperture will produce shallow depth of field.
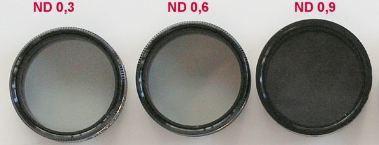
The ND filters are grey in colour and there are classified depending on the amount of light they reduce. The darker the filter the more light it reduces compared to lighter ones.
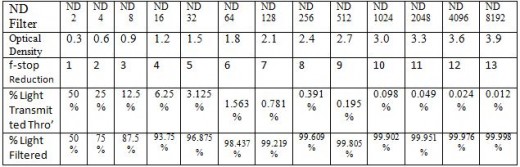
Optical density: is the amount of light falling on the filter compared to the amount of light transmitted through.
The ND filter of optical density of 0.3 (ND2) will reduce the light by 1 stop compared to an ND filter with optical density of 3.9 (ND8192) will reduce the light by 13 stops. This means an ND2 filter will allow more light compared to ND8192 filter.
So which situations do you then need an ND filter?
1. Reducing light in very bright scenes
When you want to reduce the intensity of light: sometimes it not possible to achieve the right exposure even with the fastest shutter speed and narrowest aperture. You can use the ND filters to reduce the amount of light getting through the lens to achieve a certain effect that couldn’t have been achieved using the normal camera settings.

This can also be used when you want to use the minimum ISO setting. If you have to use the flash with subjects that are very close to the camera even reducing the exposure from the flash may still bring out a lot of glow, an ND filter will help you achieve the right exposure.
2. Using a slow shutter speed in a bright scene:
achieving certain effects e.g. a blur on your shots means you have to use a slow shutter speed. Depending on the lighting conditions, if there is too much light then using a slow shutter speed may lead to an over-exposure even when you set the aperture as narrow as possible. To ensure the light is reduced to achieve the right exposure at the same time showing motion blur an ND filter is used.
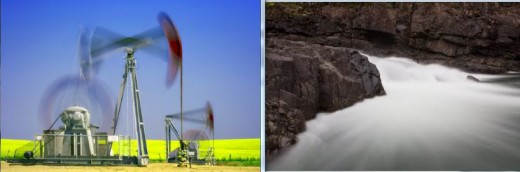
E.g. Waterfalls – when you see a photograph of a waterfall that looks milky chances are an ND filter was used to reduce the amount of light so that a slow shutter speed was used to bring out the blur. Also if you have moving objects in front of your main subject, you can use a slow shutter to ensure the moving objects are so blurred such that they cannot be seen.
3. Using a larger aperture in a bright scene:
when you use a large aperture more light is allowed to pass through. But in instances where there is a lot of light in the scene but you still want to use a wide aperture to achieve a certain effect e.g. a shallow depth of field then you need to use a ND filter to ensure the amount of light passing through is reduced to achieve the right exposure.
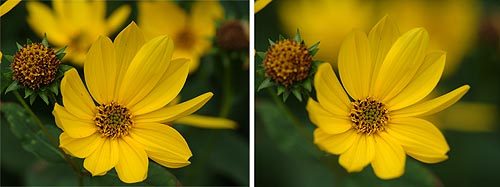
for example, Portrait photography – when there is a lot of light the camera selects very narrow aperture to reduce the light which in turn increases the depth of field, when shooting close-ups you may not need the area in front and back of your subject to be in sharp focus. Using a ND filter will help you open up the aperture to reduce the depth of field.