How to Draw a Manga-Style Character

Simple Form of Art
Manga style drawing is one of the more simple forms of art. The art consists mostly of lines with little etching, shading, and highlighting. Unlike portrait sketching, manga style drawing does not follow anatomical proportion rules to the commas and semicolons. The simplicity of the lines and curves of this form of art makes manga style drawing popular. Learning to draw manga style is easier and less daunting compared to learning traditional portrait sketching or even more so conventional oil painting. In just a matter of weeks, people who think they can only draw stick figures, can learn to create manga characters. The important point here is to have fun while learning.

First Thing's First
Getting Started
First thing about learning to draw is to grab yourself a pencil and a piece of paper of any kind. There is no sense in using expensive art paper created exclusively for manga drawing for initial sketches. Save it for later. For now, lets just stick to the less expensive photocopy paper. The pencil you use can be HB or B because it's light in color and easy to erase the mistakes.
You have the paper, you have the pencil. Don't forget the eraser (I almost did). Step one, start drawing. Draw a nice round shape and very lightly pull a straight horizontal line (H) that parts the circle into two exact halves. Do another line, this time vertical (V). You have made a base to sketch your first manga face.
Pick a side you prefer. Right-handed people might prefer the left side to handle first, the left-handed might prefer the right. Just pick one side. I'll use the left half for illustration. Notice that on this half, you have a horizontal line parting it into quarters. Draw a curve that cuts this H line.This curve should be between V line and the outer circle line. You have drawn your brow. Below the brow, draw another curve but a little bit smaller and thicker. That is the upper lid. You can draw a thin curve above the upper lid as the eye crease and add a few short lines at the outer edge of the lid as eye lashes. A little further below the upper lid, draw a small thin curve as the lower lid. Make sure to leave some space to draw the eyeball.
A circle or an upright oval can be used as the eyeball. Of course in B&W manga, the "eyeball" you see is just the iris, with or without pupil. When drawing the eye, it is advisable not to leave a wide space between the eyeball and eyelids because this practice will make your character look very, very surprised. It might be safer to draw the eyeball touching both upper and lower lids. And place it in the center and not the edge of the lids so the character won't look cross-eyed. So now that you have the iris, lets draw other attributes for the eye. Draw a small black circle in the exact center of the iris; this is the pupil. Make another circle at the lower corner of the iris; this will be the "shine". Now shade the iris lightly with gradation with the top part darker than the bottom. You have made a whole eye for one side. Copy this to the opposite side. The eye on the right side should be a mirror image to the left side.
The nose is usually drawn like the letter "V" right between the eyes. High or low placement of the nose determines how your character would look. For a cute look, place the nose just at the height of the lower lid. For a more mature look, just place it a little lower.
The mouth is drawn as a single line, unless your character is talking or laughing out loud. Lips aren't usually drawn and if it is, it's just the lower lip. Smaller mouth makes cuter character. Experiment as you like.
You have the elements of the face, but where's the face? We're forgetting something. Like chin, cheeks, and ears. Not to mention hair. But as I said before, drawing manga is rather simple. For the chin, just add a small downward protrusion from the face base circle with the peak that cuts the V line. For the cheeks, you've already had the circle, right? Ears are drawn as simple curves too. The length of the curve ranges from the outer edge of the eyebrow to very slightly below the nose. The width may vary according to your character.
Oh yes, hair. Using the face base circle as guide, the outline of the hair should be slightly larger than the circle, because the hair should cover the whole head. As for the style, you might want to copy from pictures in magazines. The hair can be straight, curly, soft or spiky. Pick the style you like and try it on your character.
Great! You have made your first character. Now make another one with a different style and experiment with it.
Remember that the important thing is to have fun.
Enjoy!
Great Stuff on Amazon

Every child is an artist. The problem is how to remain an artist once he grows up.
-Pablo Picasso-
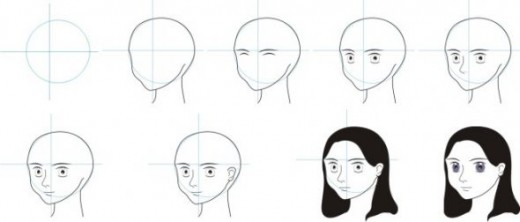
Manga Character Drawing: Step by Step - Front View

At first I would like to say I'm sorry because the update is late and it is not hand-drawn. Yes, the whole images are fully digital because I don't have any device available to scan the pictures I drew by hand. So, here goes.
First, draw the guidelines using soft pencil. Make it really fine without adding any pressure to it, so it will be easier to erase.
Some people like to draw the face shape before anything, so follow the circle as the top half of the head, and sharper at the bottom half. You can draw the face angular or soft, whichever you prefer.
Use the horizontal guideline to place two curves as eyebrows. Leave a small gap in between.
Draw the eyes. If you like cute characters, draw the eyes big and round. The pupils are optional. You can even draw a manga-style eye as a single dot. Again, your preference.
Then draw the nose. You can just draw the nostrils like mine, or draw an upside-down triangle. Both work. Or maybe a more realistic nose with complete with the bridge.
Draw the mouth between the nose and the chin. The smaller it is, the cuter your character will look.
Drawing the lips is also optional. In this picture, I only drew the bottom lip, not the upper.
The ears should be placed parallel. Pull a straight line between the outer edges of the eyes, another line between outer edges of the nostrils. The place for the ears is between these two lines.
You have more freedom drawing the hair. I chose this simple style because frankly, I'm not good with digital art and have a hard time controlling the mouse. It still works, though.
Just add the neck, a collar, and voila. You're done with your first manga character.
PS:
Sorry for the edit. I can't use too many Photobucket links.
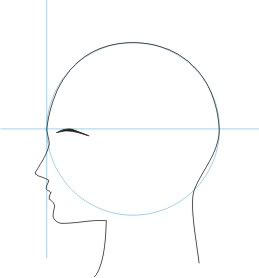
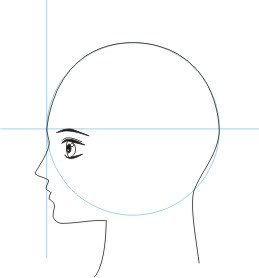
Manga Character Drawing: Step by Step Part 2 - Three Fourth Front View
It seems unfair if I ramble up and down about drawing characters in full frontal view only. So here is the second rambling about manga character drawing (again only the drawing of the head), but with a slightly different angle. The three fourth frontal, where we can still see two eyes of the character but we can't cut the face into two exact halves. Which would be gory in real life.
Start at the same place as the previous module, drawing the guidelines. The difference with frontal view is that the vertical guideline is optional. We only use the horizontal line as guide for placing the eyes, so they are in parallel position. We don't want the face to look skewed.
In drawing 3/4 frontal, the face shape doesn't have to be perfect. As long as we can see the definition between the forehead, the cheek and the chin, any shape will do. Drawing the bald head is useful, so the placement of the hair can look more realistic.
We draw the eyebrows using the horizontal line as guide. Both are of different length, because one side of the face is partly hidden while the opposite side is in full view. I'm not really sure, but it has something to do with perspective and vanishing points. But that's another story.
The nose is fairly simple. It consists only of a curvy line with the tip pointed towards the hidden part of the face, and one nostril. Yup, we don't have to draw two nostrils here.
The mouth is not that different from the full frontal view, only more one sided. I only draw the lower lip here, again. Adding the upper lip might make the image look a little complicated.
Drawing the ear is like drawing the nostril. Draw only one, not two. It will be kind of weird if we put both ears in full view. Just try it. ^_^
After we're done with the face, we can add the hair. And again, I use a simple hairstyle because I'm not much of a graphic designer. Pen tool is difficult to handle. I want to make the character a little goth, so I opt for the side-swept no-bangs long jet black hair. That, and I'm lazy. It's the easiest hairstyle to do.
Erase the guidelines, and we're done. Our second manga character ready for display.
Cheers!
PS:
Sorry for the edit. I can't use too many Photobucket links.
Manga Character Drawing: Step-by-Step Part 3
A View from the Side
Get your pencil or pen or marker and your drawing book or a piece of paper, anything will do. This is the third part of the manga character drawing series. Just like previous modules, I prepared a few images that created a sequence of manga drawing step-by-step. I apologized for any mistake I made here. And the other modules too. So here it is.
First step.

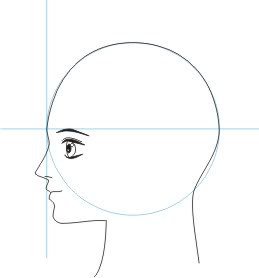
Exactly like before. First thing's first, we need guidelines. The circle as guide for drawing the head shape and the horizontal and vertical lines as guide for everything else.

Then we make the head. The top half of the head would be half-round shape. Never mind if it's a little big. You can even draw the head as huge as the Red Queen's. Now we can play a bit with the bottom half. Below the horizontal line, we can place the nose, also any shape you want. Below the nose, would be the lips and chin. For placement, the vertical line could be used as guide, but it's optional. Say if you want to draw the evil witch, you might want the chin to be more prominent than the nose. So you have total reign of your creation.
For this side view, we only need one eyebrow. So we place one curve at the horizontal line. The shape determines how your character would look, like small and thin curve for cutesy, or long and pointy for mature.
Under that one eyebrow, we draw one eye. It would be weird if we made two. The shape could be a circle or oval like in previous modules. But you also have another option, to make it lens-like. Convex lens to be exact, with the front part less bulgy than the back part. I made mine just like that.
The mouth is fairly simple. Up-turn curve for a smile, down-turn curve for a frown. I made my character smile.

One ear. Nuff said. It doesn't have to be as perfect as the anatomy atlas photo. Simple is nice too. It can be made with just a few curves. Some cartoon characters even have their ears drawn with two half-rounds.
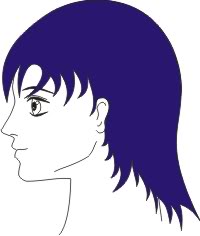
Play with the hair. Do anything you like. The style can be simple like mine, or you can draw it strand by strand to make it more realistic. Block hair like Chibi Maruko-Chan might work too.
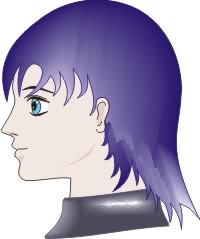
Previous modules lack lustre. Of course, they lack colors. So here, I tried to put in some colors so it could look more interesting.
That's all, folks! My third installment of Manga Character Drawing: Step-by-Step. I hope you enjoy it as much as I do.

General Anatomy - Wireframe Anatomy

This is only a general guideline that I often use to draw characters, female in particular. It's a rough draft I made using the How to Draw Manga book. Actually I wanted to make like an instant add-some-details-to-make-your-own-character kind of thing. It's based on the general anatomy rules, such as egg-shaped head, torso wider than head, shoulders wider than torso, hips almost shoulder wide (for female), elbow is waist high, hands end mid thigh. Stuff like that. I made this on CDX3 and printed a few sheets to practice drawing.
Hopefully this draft can be of use to all.
Happy drawing!
Related Links
A few links to my blog, zazzle store and deviantart.
- GirlyCharm's Zazzle Store
I designed some shirts and a few accessories using original manga / anime style characters. - Shabby Sketch Pad
A simple blog to showcase a lot of my works. - My Deviantart
I don't regularly update my deviantart account, but it contains some of my works.
Featured Lenses
My Coloring Page
I used to love my coloring books when I was a little child, especially coloring books with pictures of princesses, fairies, and magical girls. My favorite wa...
How to Draw a Manga-Style Character
Manga style drawing is one of the more simple forms of art. The art consists mostly of lines with little etching, shading, and highlighting. Unlike portrait ...

How To Learn Piano Online For Beginners
Piano is a versatile musical instrument and is probably one of the most widely played around the world. Piano is basically a keyboard instrument where the bl...
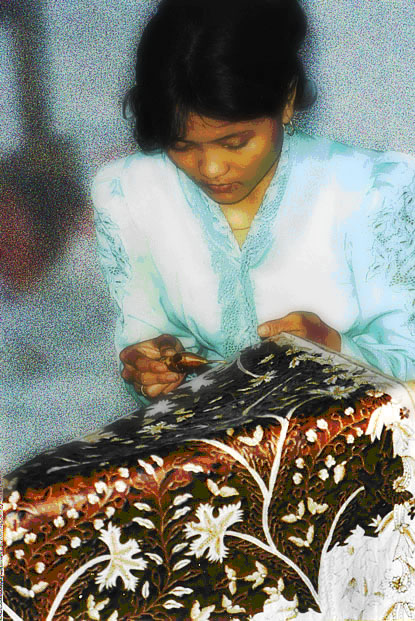
How To: DIY Batik T-Shirt
Batik, a type of patterned cloth created through some kind of resist technique, is a part of ancient Indonesian heritage. Although other forms of decorated c...
Drawing from Guidelines

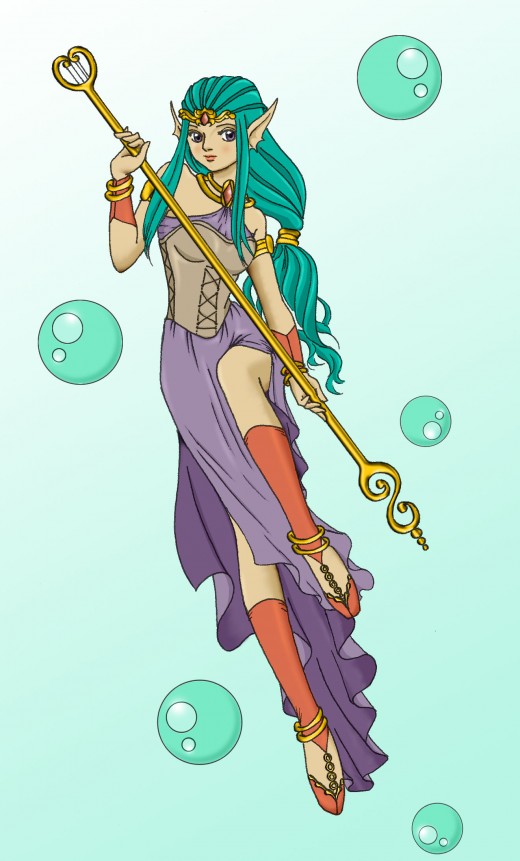
This is just a sample drawing using the full-body wire-frame from the last module. The method here is to draw following the lines. It doesn't have to be exact. We only want the proportion. Seriously, I've tried copying the exact lines and ended up with an anorexic robot. Adding some meat on the character gave a nicer result. More human-like, at least. It's not perfect. The character is still too thin and the shoulders are a little wide.
Oh well, practice makes perfect, doesn't it? We''ll practice together.
Happy drawing, everyone!
Learn To Draw Manga From The Master
Mark Crilley, Youtube Manga Guru
Mark Crilley is an American mangaka who created Akiko, Miki Falls and also Brody's Ghost. I am a huge fan and never missed his tutorials on youtube. What I love about the video tutorials is that it showed step-by-step method of drawing manga characters. Not just human characters, there are tutorials about drawing dragons, drawing the scene and background, etc. You can check his youtube channel here.
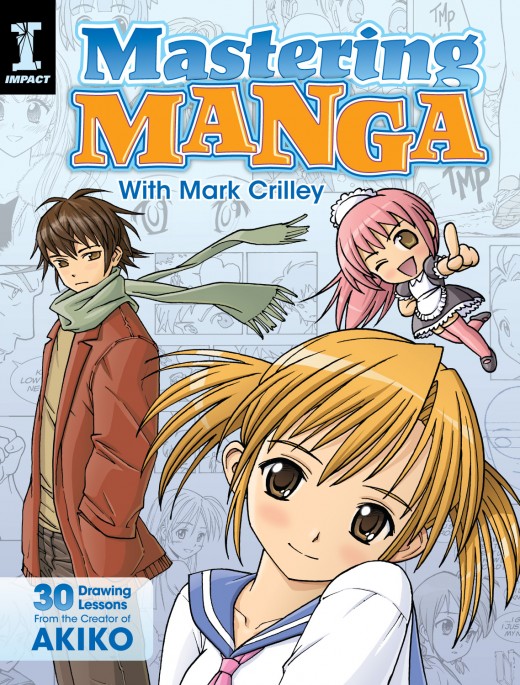
Not only video tutorials, Mark Crilley has also published a how-to-draw-manga book, titled Mastering Manga with Mark Crilley: 30 drawing lessons from the creator of Akiko
. This book contains tutorials on drawing manga characters from face to figure to movements. There is even a part about drawing full figured characters that we don't often see in mangas. It's almost like Manga 101 the textbook, but a little more fun. Just check it out and practice drawing manga with his guidance. It's really a pleasure...
Happy drawing, y'all.
My Favorite of Mark Crilley's Tutorials - Drawing Manga Eyes
This tutorial guides us how to draw eyes manga-style, line by line, step by step, in real time. One of my favorite from the whole collection, apart from the hair tutorial. Some of his tutorials are in time lapse so sometimes viewers need to pause the video to follow the instruction. This one is in real time.


