How to Use Google Alerts for Niche Marketing

Google Alerts is a great tool to use for niche marketing. If you manage a network of websites in a particular niche or even across many different niches, using Google Alerts can help you stay on top of what is going on within these niches. This will help you become the expert within your niche so that will add to your credibility and help you get more sales of your products. There really is nothing to using this, but I'm sure many of you may not even be aware of this tool and how it can help your internet marketing efforts. In the course of this article I will show you how to create alerts for your niches and how to receive regular reports generated via these alerts on new content being created on the internet at the interval you select. This can free you up to take care of the other tasks that need to be handled in your internet marketing business without wasting time looking for more information on your niches.
The first thing you should have before setting up a Google Alert for your niche marketing efforts is a Google account. If you have a Gmail account or adsense, then you already have this requirement taken care of. If not, it is a simple process to set up. Go to set up a Gmail account. Click the link and follow through with setting up your email address. You really shouldn't need my help with this it is so simple.
Once you've set up your Google account, go back to a Google page, click
the "more" link at the top of the page left side, click "even more" at
the bottom of the link menu that appears, and you should come to a page
with all of the available Google products. You should notice the
option at the top left is for "Alerts". When you click this link you
are taken to the page where you create a new alert. You should be
logged into your Google account before creating your alert, so if not
already logged in, do so now. You could also just follow this link to create a Google alert.
Setting Up Your Google Alerts

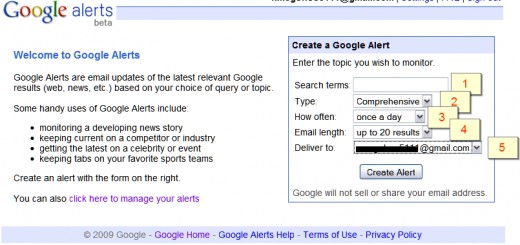
Notice on this page is says Create a Google Alert,
and below that is a blank box for your search terms(1). You want to put
in here the keywords you use for your niche that you would like to
receive alerts on. So, for example; if your niche is on women's pink
derby, you will want to type into the box "women's pink derby" with the
quotes as I have here. You want to use the quotes so that you are only
getting results for that specific phrase that your niche is focused
on. You can also create broader alerts without quotes, but you run the
risk of getting too much information unrelated to your niche topic.
Keep in mind that the Google Alert should be saving you time in finding
the information specific to your topic rather than costing you more
time with sifting through unrelated garbage, so fewer results that are
targeted are going to be preferable to more, yet broader and sometimes
irrelevant results.
The box below your search terms allows you to select the type of alert
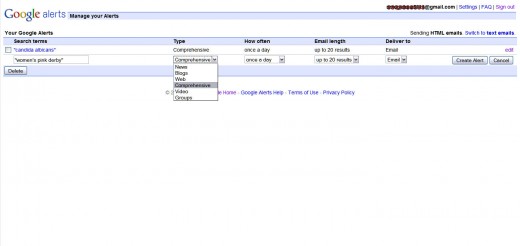
you want(2). Your available choices are News, Blogs, Web, Comprehensive,
Video, and Groups. I choose the Comprehensive option as this gives
results from all of the available choices, but feel free to select
which one makes the most sense to you for the type of results you would
like to receive. Below this is the "How often" selection(3). This tells
Google how often to send you the results of your alerts. You can
choose from as-it-happens, once a day, or once a week. Unless you need
up to the minute updates, once per day or once per week should be
sufficient. I choose once per day, so I can decide if I need to update
any of my sites with a new post containing fresh information for my
readers.
The next box is "Email length"(4), and this gives you a
choice of up to 20 results or up to 50 results. Pick the one that makes the most sense for
you. The final option to select before creating your alert is the
"Deliver to" selection(5). This one gives you the choice of an email or
deliver to a feed. The feed option is great if you use RSS and have
your reader set up to follow various blogs and topics using the RSS
functionality. Almost everyone should be familiar with email, and
therefore email is the easiest option. If you prefer to use the feed
option, by all means select that! One thing to bear in mind on the feed option is that your results will default to "as-it-happens" and you will need to add the URL given or click the "View in Google Reader" link once you've created and are able to view your alerts (screen shot below).
Inside Google Alerts

Now that you have selected all of the options, you can
click on the Create Alert button, and Google will create your alert
immediately. If you selected the once per day or as-it-happens
options, you will likely start receiving results right away as well.
You can easily edit these options and change them to suit you if your
needs change. You can also set up multiple Google Alerts with slightly
different search terms or without quotes if you are having trouble
finding frequently updated information within your niches. The key
here is that this tool should be saving you time from having to search
for information rather than creating more for you to do, so set your
alerts up in the manner that will free you up the most.
Hopefully this has helped you to see how yet another of Google's free
tools: Google Alerts will assist you in staying on top of your niche
marketing endeavors. If you liked this article and found it
informative, please rate it up below.


