HubPages Making Money Online: How to Create a Page & Basic HTML Tips Tricks

PART 1: Write Your Content With Ease
In my previous article I discussed EVERYTHING you need to know to be a successful online author. In this article I want to delve specifically into “How to Use Hub Pages” with a little bit of HTML help and so on; this article is designed for those who want to learn easy ways to do “Cool Things” to their Hubs (“pages”).
I always like to begin with the “basics”, so in this article, lets start with HOW TO CREATE A HUB
PART 1: Write Your Content
I HIGHLY, HIGHLY, HIGHLY (Did I say “Highly” yet?) recommend ALWAYS writing EVERYTHING in as a Word Document and SAVING IT in a manner which makes sense. My suggestion would be making a Desktop folder called “HubPages” and organizing your content by month or topic. Whatever you do, DO NOT EVER publish ANYTHING online with no backup. Trust me on this, a lot can go wrong; sites can close down, sites can glitch-out, your profile may suddenly become inaccessible with no tech-support available… you NEED to make sure you always have access to everything you spent your valuable time producing.
Anyways, I like writing in Word because it Spellchecks for me and I can use BOLD, ITALICS or UNDERLINE and it transfers to HubPages with a simple Copy-And-Paste (or Ctrl+C then Ctrl+V).
So now that your content is written, lets get our Hub created!
PART 2: Start Your Hub
I.) In the current layout of HubPages, you will find “START A NEW HUB” located in the upper right-hand corner of the screen. – obviously, click on this…
I.) Now you will come to a screen where you need to lay the foundation for your Hub. Since you already wrote your page (and saved it!) in Word, you should already have a TITLE. Copy and Paste your title or retype it. (I am going to use this article as an example).
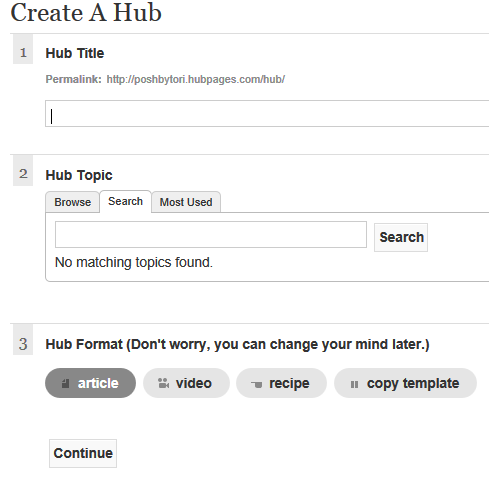
I.) Now you will want to select a category and sub category. (Self-explanatory….right?)
II.) In the “FORMAT” Section, you will see that “ARTICLE” is already selected. In this case, we shall leave ARTICLE selected because I am not publishing a Video, Recipe or Other.
Select “Continue”
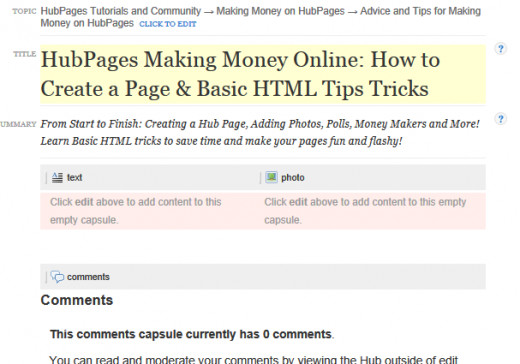
(Photo Below) As you will see, your TITLE has already been filled in. If you notice an error, you can correct it. If not, then move onto “SUMMARY”. *DO NOT mistake “SUMMARY” for being an eye-rolling task. The summary is very important because it triggers Keywords that are used to find articles! Keep your Summary to-the-point, but NEVER give away your “goodies”. If your Summary contains the valuable “secrets” your article holds, then theres no point to reading your article. So think of it like a movie preview; lure the reader in with something exciting that just screams “OMG! READ ME!” (but don’t actually say those words). So for my purposes, I am going to make my “Summary”
“From Start to Finish: Creating a Hub Page, Adding Photos, Polls, Money Makers and More! Learn Basic HTML tricks to save time and make your pages fun and flashy!”

It is now time to officially get this Hub rolling! Lets add some TEXT by clicking on the box that says TEXT. You can either click on the pink colored part OR select the white icon on the box that says “EDIT” (you will need to mouse-over the TEXT area for this icon to appear).
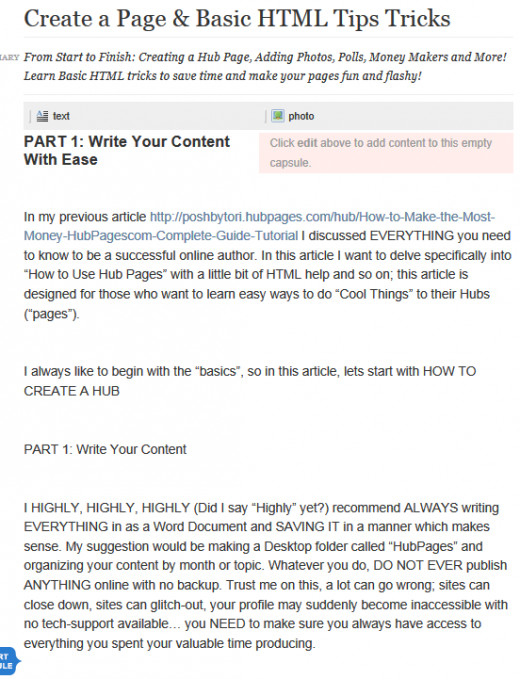
Now you will notice a popup box (Also called a “Capsule”) that asks you to enter a SUBTITLE followed by TEXT. The SUBTITLE is excellent for breaking your content up into sections that are easily readable. Let me give you an example of why SUBTITLES in each Capsule is cool:
Let’s say you already know how to make a Hub and the past 700 word you have read has done nothing but annoy you and make you hate me; well instead of searching for ways to send me a virus or telling me my Hub sucks, you could simply skip all of this part and go to the SUBTITLE of HTML TIPS & TRICKS; this is now a total win-win for us both because I don’t have to worry about my tired getting slashed and you can get your needed HTML info. So, for my article, I am going to call my first section / Capsule “PART 1: Write Your Content With Ease
Now all I am going to do for the “TEXT” section is look at my Microsoft Word Document and Copy-and-Paste the information that relates to my subtitle of “PART 1: Write Your Content With Ease”.NOTE: When I “paste” my content, I immediately notice that it looks sub-par; theres “Big Gaps” that are a total eye-sore. – DON’T WORRY, we will fix this, but not right now. For the time being, just give your text a quick glance to make sure it is what you wanted and select the “SAVE” button in the upper right of this box.
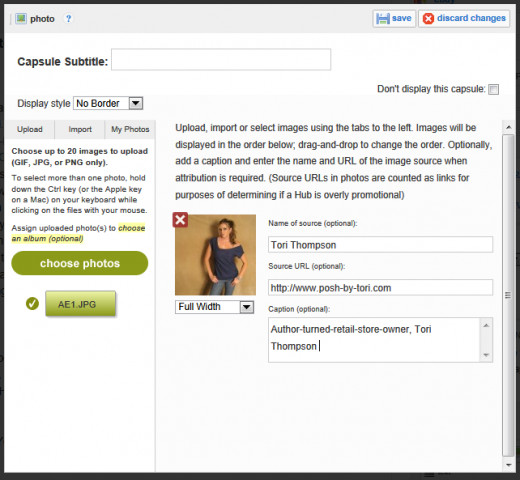
Alrighty, so now we officially have our Hub in progress. My options now are: 1. I can add a photo or 2. I can add more text. (Technically, I can add anything I want, but since I only have a little bit of text, I personally, want to make my page look good before I throw in ads and such). So I am going to opt to add a photo of myself since I am the author. – You can add a pic of anything you’d like here. In my case, I am going to upload a pic of myself by clicking on the PHOTO box, then “UPLOAD”. I am going to leave the Capsule Subtitle BLANK; you are welcome to add a subtitle if you want to. When I’m done, I’m going to select “SAVE”.
Next I want to continue on with my article (AKA: “Hub”). I want to add more TEXT, so from the right-hand sidebar I am going to click on “TEXT”. As soon as I click this, a new TEXT “Capsule” is going to appear UNDER what I already finished. *Anything you “add” (Text, Polls, Photos, Amazon, etc) will ALWAYS appear UNDER what you previously did. Don’t worry if you need to change the order, we can do that shortly.
So now I scroll down to the area BELOW my first TEXT capsule and ABOVE the “Comments” section – here’s a new TEXT box that is pink and white, just like the one I already did. Now I can begin my second section. I am now going to repeat all of the steps from above; sections VI-VIII.
PART 3: Spruce Up Your Hub – Add “Widgets”
If you want to add more photos, Text Capsules, some images, etc; Let’s do it! Simply look in the right-hand sidebar again and you’ll see a list of everything you can keep adding (...and adding...and adding....):
So now that I feel comfortable that my “Content” is really good, lets add in some Money-Makers.
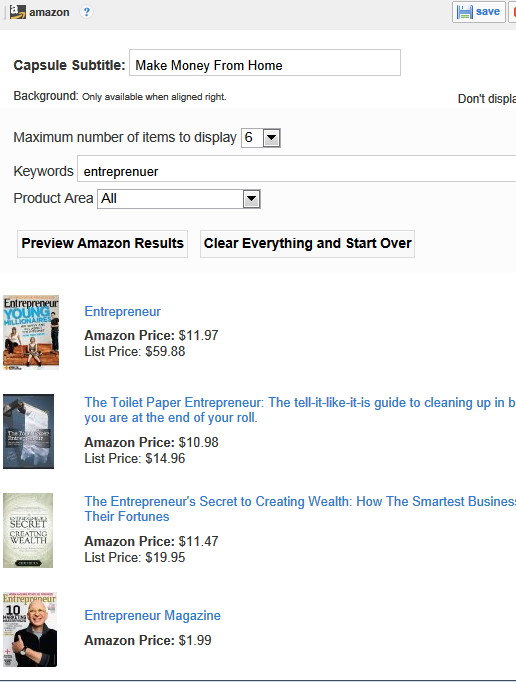
Starting with…(drumroll, please….) ….AMAZON.com. To add an Amazon.com Money Maker, select AMAZOn from that same right-hand sidebar list. When selected, you’ll need to scroll down to the bottom of the screen again and determine WHAT you want to make money from. Here we have two options: 1. Do we want to “Select Products”? OR do we want to “Select Keywords”? *I, personally, prefer to use KEYWORDS to eliminate the items I am promoting from being sold out / discontinued.
So, if your article is about “Ugly Christmas Sweaters”, then you’ll want your keyword(s) to be “Sweater”. In my case, my article is a tutorial about using Hub Pages, so I don’t really have a ton of options here, but I know that people looking to use HubPages are looking to Make Money Online…and most likely as a way to subsidize their income, so I am going to find some products that people looking to make extra money might be interested in…so my keyword is “entrepreneur”. I can then PREVIEW results to make sure that I am not peddling products that are going to make me look like a moron. (See photo below)
NEXT I’m going to add EBAY. Same deal; go to the sidebar, click eBay, scroll down to bottom of page and click EDIT on the new eBay box.
This time I am going to change my keyword to “Wholesale”. The only reason I am changing my Keyword Search is because I already have a list of “entrepreneur” items through Amazon, so there’s no need for two similar lists. By aiming for “Wholesale” I might be able to get an impulse buy of an entrepreneur wanting to open a business.
Now that I have some Money-Makers, awesome Content and some photos to spice up my killer article, I am going to throw in a poll that is beneficial to ME and the reader. In this case, I am going to put in a poll about MAKING MONEY FROM HOME:
Take Our Poll and Get More Content YOU LOVE
WHAT DO YOU WANT MORE INFO ABOUT?
But lets pretend your article was about Fashion, your poll could be:
CAST YOUR VOTE!
Who Has the BEST Fashion Sense in 2013
Ok, you get the picture. Lets say that, at this point we feel our Hub is totally complete. All we have left to do is a little HTML to quickly and easily get rid of those ugly gaps from our Copy-And-Pasting.
SUPER EASY HTML for HubPages
HTML is NOT scary. You do not need to be a computer programmer or rocket scientist or even relatively intelligent to be able to do this. Hell, I taught myself and if I can do it, anyone can.
So lets start with the most simple parts of HTML: http://poshbytori.hubpages.com/hub/HubPagescom-HTML-for-Beginners-Guide-Tutorial-For-Making-Money-Online - Continue on!!!