Using Corel Photo Paint Pro and Serif Page Plus Photo Editor in HubPages


Corel Photo Paint Pro and Serif Page Plus photo editors for HubPages
How to make a page come to life using photo editors and just a bit of imagination? I’m not a computer expert, so I’m not going to go into all the technicalities, but rather show you just a very few ideas to vary your pictures and make your Hubs a little bit different. I use Serif page plus 11, Corel Draw and Corel Paint Shop Pro Photo IX, but there are tons of other photo editing packages out there, including the most famous, Photoshop.
It first dawned on me that sometimes it might be a good idea to ring the changes when I saw this prizewinning Hub Best Mon-and-pop restaurants in Sacramento by Om Paramapoonya. I don't know how she did it but it did set me thinking.
These are all quick, easy and achievable effects that anyone can do with very little practice and I've included links to some more technically orientated articles at the end of the article.
Good luck (or Bon chance, as they say in France)
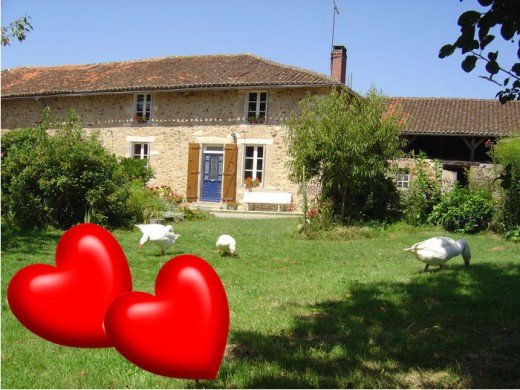
I used Serif Page Plus to Add Objects to Photos
Add an object
My Les Trois Chenes farmhouse Bed and Breakfast avatar is my on-line signature so although I like to response to news, festivals and events, I don't like to change it completely as then people can't recognise me. Adding an image or an object using a photo editor can solve the problem - this is my twitter Valentine's Day image. Using Serif Page Plus I drew a heart, coloured it red, chose a 3D effect, copied, pasted and rotated them. It's a bit crude but time's money and they do the trick! The same goes for Easter, for Christmas, birthdays, holidays, holy days ....
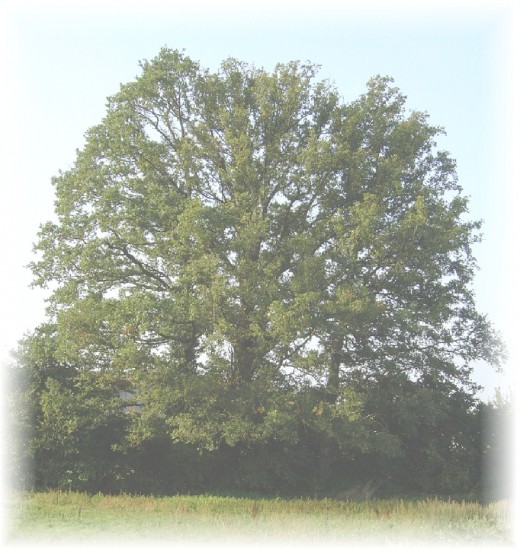
Fade it out
You can decrease the opacity of the image and feather the edges with just a couple of clicks. These are our three oak trees that give Les Trois Chenes its name.
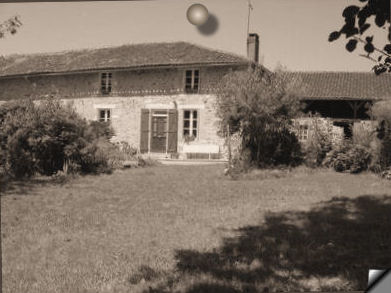
More tricks of the trade using Corel Photo Paint Pro
Colour it. Take a jpg image and change it's colour. I used sepia, but noticed in my Corel Photo Paint Propackage there's an old newspaper option that colours it a slightly yellower brown. I've lifted the corner a bit but this isn't very satisfactory. Anyone any other ideas.
I've also made a drawing pin from a circle with a circular gradation texture and shadow added. I skewed the photo a little, hence the sliver of black at the top.
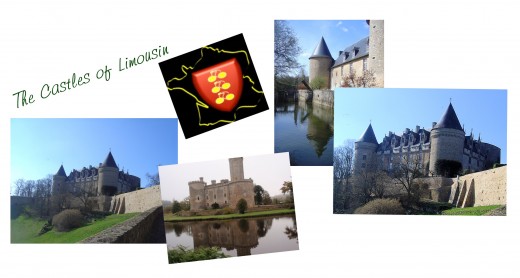
It's easy to put multiple images into one picture with photo editors
In this image I've imported, sized and rotated several pictures onto one page. Added some text, and rotated that too.
You could also just take a photo with your digital camera of a group of photos on a table. Print text out, trim it and lay that down too.
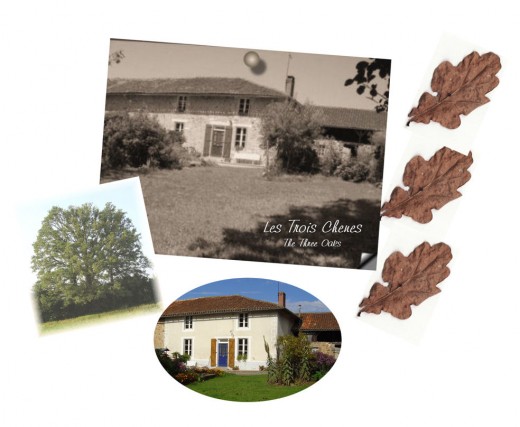
The same goes for the image of the house with the oak leaves below. I scanned the leaf and then copied it twice to get three identical leaves, rotated them and put them with the other images, then added text and rotated it. Again, you could print out the pictures and make a collage using the leaves and take a photograph of it rather than use photo editing software.
Useful Links for editing photos
- Have Fun with Free Online Photo Editing Tools
As most of you who visited my previous hubs would know about my interests in photography. Nowadays, there are so many online photo editing tools which would help you to explore your creativity. There are... - A Guide to Basic Photo Editing with Photoshop
There are a lot of amazing photo editing programs on the market, but to the beginner they can seem intimidating. With a few simple steps one can clean up, modify and enhance their digital photos using Adobe Photoshop CS. - Photoshop Tutorial - Make Custom Scrapbook Pages.
Scrap booking is honestly a subject I am just beginning to become interested in. I am by no means a pro. I have been making scrapbook pages for others for a few years now. This started when a friend of my sister's was talking about how much she spen

![Adobe Photoshop Elements 2018 [Old Version]](https://m.media-amazon.com/images/I/51AQ4wl7eOL._SL160_.jpg)
I used a scanner to create textures background for some images


Using textured backgrounds for photos
The image of the onion below uses the same technique as the collaged photos and leaves, except that this time I've used a textured background.
I scanned in sheets of various materials, Japanese paper, crumpled paper, crumpled foil etc to make backgrounds. These could then be coloured, faded or have photo-editing textures applied. Alternatively you can make these backgrounds with the editors themselves, but mine seem rather limited and artificial. I'm going to be on the look-out for nice patterns and textures from now on - William Morris wallpaper, old fabrics, plants ...... I'll make a hub of free textures to share when I have a few.
Then I opened this background, added the image and text. I couldn't work out how, (assuming it's possible), to put a border around my onion, so just stuck a brown rectangle behind it. I think the background could have been faded a bit, and the brown border could have been faded a lot for a more subtle effect, but these are my first attempts,and with thought, practice and time I'll get better - and so will you.
I would also like to experiment with printing out text, tearing up the paper and then re-photographing it.
You know what, I realise that I'm doing exactly the same images as I did on canvas as an artist!

Different shapes images enliven a page
I use Corel Photo Paint Pro and Serif to create different shapes for images. I think a circle, like my duckling above can be cute for a small image - or can get rid of unwanted background easily.
I chose an oval shape for the image of our house before we took the rendering off because it makes me think of times gone by.
In the photo editor I chose a circle and an ellipse to crop the images. Just takes a couple of clicks and off you go. You can then make the edges faded by feathering them, or put picture frames around them or use other edge effects.

You can create all sorts of special effects with Corel and Serif
OK, this is pretty rough, I grant you, but again, time is money and I'm no expert on these packages. I'm sure, though, with a bit of expertise and/or dedication, you could do something really cool.
This was an illustration that I made for the 'Health and Safety in the Killer Kitchen' Hub, a contestant in one of Stan Fletcher's competitions, which started as a joke and snowballed into a really fun extravaganza. It got me right out of the po-faced academic mode.
What you can do within HubPages to ring the change of your images
It took me a while to realise that you can use HubPages to put a border around your image, see my breakfast photo below, or to create a main image with click-able thumbnails, also see below. This is a great way to show lots of pictures without taking up space.
Click on the HubPage photo module, and in the top left hand corner you will see a pull down box labelled Display Style. Your three choices are no border, with border and thumbnail
Put a border around your HubPages photo

Choose the Thumbnail option
Click thumbnail to view full-size


Pictures from Les Trois Chenes
Click thumbnail to view full-size


")


")


Don't go wild with your photo editor
Once you discover everything that you can do with Corel Photo Paint Pro and Serif Page Plus, the temptation is to put every technique into every hub.
A word of warning - use these images with care.
On this page you can see how bitty it looks with so many different styles and images. Better to make a group of images all of the same style, as Om Paramapoonya has, or use just one for effect.
Don't like my pictures? But these were done crudely and quickly, or for various purposes, and serve here not as an art exhibition, (that might come later though), but only to give you ideas. With thought, time and practice you'll be able to make the most beautiful images using these simple techniques.
Other hubs with creative images
Road-trip-across-America by SimeyC
Good luck and let me know how you get along.
Other articles which may be of interest
- Do I see benefits from my HubPages?
This was a question that one of my followers, owner of Basse Copette, asked me on Twitter. Like Les Trois Chenes, Basse Copette is a Bed and Breakfast with luxury gites in France but while we are in the South... - How to mark a route on Google Maps, save personalised maps and get backlinks
I needed to know how to mark a route on a Google Map, save it, and incorporate it into my articles and have just discovered how. I write about Les Trois Chenes and our life here. Les Trois Chenes is the name... - Les Trois Chenes Profile in Pictures
Painting holidays at Les Trois Chenes Bed and Breakfast Videix, Limousin, France. 87600. We also have a gite, or self catering holiday cottage so there are many ways to spend a wonderful holiday in the French countryside. We are ten minutes from Roch - Find an article by Les Trois Chenes
We run painting holidays and courses, a bed and breakfast and self-catering holiday cottage in Videix, Limousin, S W France. I write about our life in France and this is an index / biography of my HubPage profile and articles.
Want to lean more about photo editing?
At Les Trois Chenes I run painting and drawing holidays and art courses and I would be pleased to tailor a course to your photo editing needs.
Contact me on +33 (0)5 55 48 29 84
info@lestroischenes.com
Or visit our web site info@lestroischenes.com
Have I inspired you to get creative with your photographs
Will you be trying photo editing with Corel or Serif?
© 2011 Les Trois Chenes