How to Do DNA Extraction in Your Kitchen

This experimental work is meant as simple and educating activity using common and easily available materials and products from everyday life in our homes, mostly in our kitchens, so that students can repeat this protocol at home. Also, it gives the chance for teachers working in not well equipped schools to show their students a bit more of what DNA and ultimately genetics is all about. Basically, this experiment offers and introduction to what is done in a genetics laboratory, being very similar to the first methods used by scientists first investigating DNA. Although quite popular, often topic of heated debates, teaching genetics is not an easy task, especially to younger classes. Today, although understandable in some respects, genetics and cell biology is mostly taught in high schools with very little supporting lab work. Students are mostly oriented in to look at and analyze pictures, diagrams of molecules, atoms, chemical bonds, structure and some fundamental chemical reactions. In addition, is required that they have already some insight and knowledge about cell structure and how living organisms are organized. In the end, most of high school students graduate and continue their studies to university knowing that DNA is a big molecule, highly twined, folded and packed inside the nucleus of cells which would have kms in length if it would be completely unfolded. Ok, all this is true. But, what about its colour? Does it dissolve well in water? Can we make a solution with it? Use it in reactions? How is it extracted? What one needs to do it? Did you know the answers to these questions when you graduated from high school? Well, I did not … I understood the concept of the double helix and could somehow have an idea of some of its advantages. But that was mostly it.


With this activity we hope to help students realize that DNA is found in all cell types and its appearance in solution and properties are similar regardless of the tissue or species from which it was extracted. Also, those students with a stronger background in cell biology should takes this experiment as an opportunity to further discuss the properties of proteins, cell structure and its relation to the study of genetics. As mentioned before, to best understand and perform this experiment, students should have learned beforehand about cell theory, organization and function of the cell organelles, protein structure and their function. In the end, you will not be able to work as full CSI but at least I hope you will understand that there is more to DNA profiling than just pushing buttons on apparently sophisticated machines that send you the results to your iPhone. What if one the machines breaks, or you can get no signal while you are waiting and drinking bloody marys with your beautiful assistant Helga? Think of this experiment as more like “what would Sherlock Holmes do if he knew about DNA?”
Getting Things Prepared: Tissue Samples
This experiment is designed in order to extract DNA within an hour or so, which gives the opportunity to perform it and discuss its main topics in a typical 2 hour lab class. For convenience and to best illustrate its goal, namely that students understand that DNA can be found in virtually all living tissues, provide at least tow different sources of tissue, e.g. animal vs. plant tissue. To that end, among the most suitable animal tissues you can chose from there is thymus, liver, lungs, kidney, for example from cattle, pork or chicken. Perhaps, depending on your local butcher, thymus may be more difficult to acquire, compared with the others. However, in addition, compared to the others, thymus is best because its cells provide large amounts of DNA. As plant tissue you can use peas, beans, onions and yeast (from your bakery) or mushrooms (from your local supermarket) as illustrative of fungi. On choosing plant tissue, avoid specialized tissues like potatoes, fruits or tissue rich in fibres. Whether by presenting large amounts of sugar, starch, pigments or fibres, specialized plant tissues can present sometimes difficult to manipulate with the method here described and other measures might be needed in order to achieve the same goal. However, before doing it in class with your students test the samples yourself and see how it goes with the equipment you have. This way, not only you will become familiar with the procedure but also you can predict possible problems and learn best how to resolve or avoid them in class. Onions produce large amounts of DNA while peas, like beans, can present as a good alternative because even if students do not isolate DNA adequately, they are a good source of protein which will appear in the end as a large white and viscous mass.
How to Do It:
Phase 1:
Basically, gather the following materials:
- Blender
- Beaker
- Tissue Samples (preferably of two different species)
- Teacups (about 100 ml volume)
- Teaspoons
- Dishwashing liquid
- Salt
- Water
Use the table below as reference:
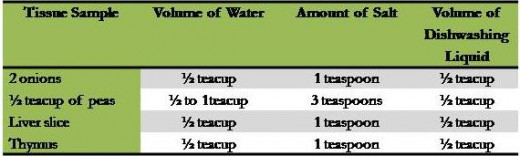
- According to the table above dissolve the salt in water the sample chosen.
- Place the chosen tissue sample in the blender and cover it with salt water. Mix everything until you get a homogenous liquid solution, like a milkshake. If using onions or any plant tissue more fibrous in nature, cut it into small pieces beforehand in order to facilitate the mixing and liquefying with salt water.
- Transfer the mixture to a beaker and add about ¼ of dishwashing liquid and mix it for about 5 to 10 minutes. Take this opportunity to discuss with students the role of slat water and detergent and their utility when dealing with living cells. In addition instruct students or discuss with them the effects that these treatments have on cell structure and organelles.
Phase 2
Materials Needed:
- Paper filter or Coffee filter
- Colander
- Funnel
- Beakers
- Marker
- Test tubes
- Adjust the paper/coffee filter onto the funnel and filter the mixture prepared in Phase 1.
- The mixture, prepared previously in Phase 1, resulting from liver as well as many animal tissue samples becomes too viscous to pass through the paper filter. Therefore, in these cases use the colander instead.
- Mark a line close more or less at the middle of a test tube and fill it with the filtrate up to that line.


Phase 3
What you need:
- Isopropanol at room temperature
- Toothpicks
- Mark a second line above the first one made in Phase 2 in the test tube with the filtrate and add isopropanol carefully into the test tube up to that second line. Note that, after adding isopropanol DNA will come up separating from the lower aqueous layer. DNA will appear like small threads rising in the isopropanol layer, together with some gas bubbles.
- Gently rotate a toothpick into the test tube to remove the brittle DNA films. If DNA is too fluid to be removed with the toothpick try with a pipette. Remember students that what they obtain is not isolated DNA rather DNA together with RNA and many protein material. However, this experiment allows students to visualtized the contents of the cell nucleus as white threads in solution.
To untrained eyes it may be difficult to see the DNA. Therefore, you should encourage students to repeat the experiment with tissue samples from different sources by repeating this protocol for each sample chosen. If your students have a good chemistry background take this opportunity to discuss with the several separation methods used and their utility when dealing with biological tissues.
As a rule of thumb, test all these procedures yourself before trying them with your students so that you know how to best resolve situations that always occur in lab classes. For example, you may notice that the amount of water used in the preparation of the mixtures in Phase 1 from the different samples may be different depending on species/source chosen. Also, a too dilute or too concentrated mixture may hinder the filtration and separation of DNA when adding isopropanol.

Playing CSI: Whodunit??
Now, if your students behaved well enough and if you still have time you can have them extracting their own DNA. Yes, let us play some CSI detective work. To that end, use the equipment as before and do the following:
- This time prepare a highly concentrated salt solution and have some students (or all of them if possible) to wash their mouths with that solution for 2 minutes, like they do it with the typical mouthwash.
- Afterwards have them transfer that solution into in a beaker and then filter it like in Phase 2 described before.
- Mark two lines on a test tube like you did before and transfer the filtrate to a test tube up to the first line. Add isopropanol carefully up to the second line.
- Observe and isolate DNA as before in Phase 3.
- As in any experiment, do not forget to instruct students to note and record everything that they observe carefully.
So, in the end, whodunit??
Other topics that you can discuss with students:
- History of Botany: Part 1, from the Ancient Greece u...
The earliest classifications of plants were primarily utilitarian classifications: that is, they included mostly medicinal or other useful plants. Therefore, they were limited to human experience and to their importance in ancient human societies. - History of Botany: Part 2, The Development of Taxono...
Plants were classified on the basis of a few key features until the seventeenth century, when John Ray developed the first classification based on multiple features. Ray's c1assification showed natural relationships among plants. Linnaeus is credited


