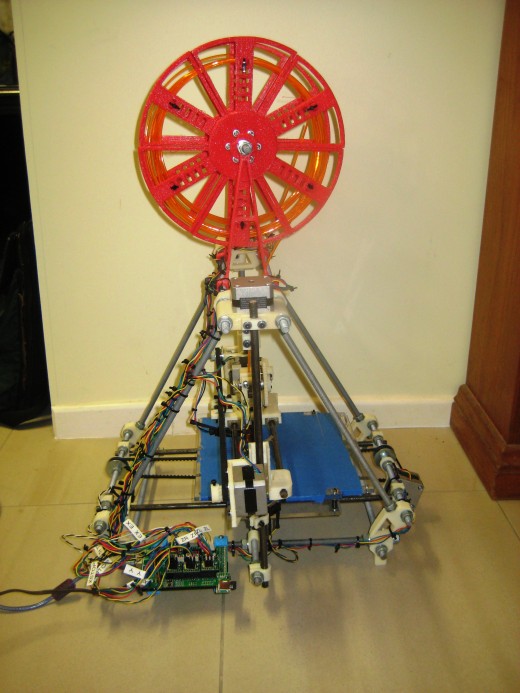
How to Build a 3D Printer on a Budget

Threaded Rods
This one looks easy, but I found that a meter of threaded rod at my local hardware store would cost around $7, meaning I would be looking at over 550 for all the lengths I needed. Instead I found a proper industrial shop, which specialized in hardware, not the home hardware sections for the average Dad, but a supply shop where actual businesses get their gear. A meter of threaded rod for my 3d printer here cost my around $2.
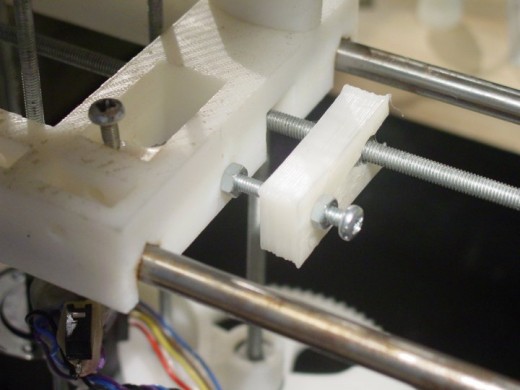
Smooth Rods
These are the money rods of your DIY 3d printer. I've seen these go in 3d printing websites for up to $60 for the set. They are just steal rods. I found an industrial area near my work which had heaps of stuff you wouldn't think to look for other than a 3d printer kit. One place was a steal warehouse. I was able to get a 6 meter rod of bright steal (a little bit stronger than stainless steel) for less then $20. They even cut it down to all the lengths I required for free.
Stepper Motors
Unless you're really really into electronics, don't mess around with trying to salvage stepper motors from other appliances for the sake saving a few pennies as correct stepper motors are an integral part of the reprap's design. Even if you do get them to work, they will no doubt be some sort of an odd shape that will be a pain in the backside to try to attach securely to your printer. Just buy the recommended NEMA 17 stepper motors, making sure they are at least 4400 torque (4800 would be better). Also, don’t do what I did and slowly buy all the motors separately. Not only could they have different step rates, they could also have different coloured wires (reprap steppers have 4 wires), so it can be a pain to try and keep track of what colour goes to what.

Hot-End
Now this tip to save money may surprise you. PAY FOR THE BEST ONE YOU CAN AFFORD. The hotend is the most troublesome piece to 3d printing, so if there is ever a place to cut corners, it isn't here. I think I must have gone through at least 5 different hotends before I found one that plays nice. A decent one shouldn't cost more than $100. A good hotend should allow you to print with less (or no) jams and be easy to disassemble when troubleshooting. This is down to personal preference but I found the Budaschnozzle. The budaschnozzle comes fully assembled and ready to go- no messing around with trying to get the thermistor to attach to the hotend or fiddling with bootlace ferrules trying to get the power resistor wires to stay together - just plug and go. Also, you can switch between 3mm and 1.75mm with just a simple change of a piece of ptfe which is also very cheap.
Vitals
Nuts, Bolts, Bearings oh my! All seem a little overwhelming? Seem easier just to buy the '3d printer vitals kit?' I thought so when I first started out. Then I realised your basic 3d printer is assembled using essentially two different thickness of bolts (M3 and M4). If you have a bit of a read of the different vitals used in a reprap assembly guide you will see that 3d printer vitals are nothing special and can be picked up at any hardware store or on the internet. One tip though, work out if you are going to build a metric or an imperial/SAE printer. This will probably depend on personal preference. Myself, I like metric, which deals in millimeters when referring to different vitals. If you prefer you can go SAE, which is for the pro's who like to deal in fractions of an inch (e.g.5/16”).
Electronics Board
Now this is an interesting one. I started with a budget 'all in one' 'Printrboard', which was cheap and had both 5 stepper controllers build into the board. It was not a separate shield which attached to an Arduino board, but was all inclusive which I thought was quite sleek. Now unless you're quite careful (which I am not), you may find that you will fry a few things on your electronics. I managed to burn out a stepper driver by adjusting the pots which it was mid print. I also blew two out of the three integrated thermistor pull-up pins. Now I would have screwed the pooch on any electronics board I used, but if I had shelled out a little more initially for a board with more features I may not have had to write it off. Some of the better (but more expensive) boards such as RAMPS have six stepper controllers which not only allows for upgrades, but gives you a little leeway in case you fry one. Also, instead of being integrated into the board, the stepper drivers are replaceable I picked up a replacement driver for around $10 - much better than having to replace the entire board. So do your wallet a favour - buy a good quality board up front.
- RepRap Buyers' Guide - RepRapWiki
- 3D Printing at Home
Imagine seeing a pair of your favorite sneakers on the internet, and then being able to download them and have them built right in front of your eyes. - How NOT to Build a 3d Printer
Join me on my 24 month journey of how to make every possible mistake when building your own 3d printer - 6 Great Tools for your 3D Printer
A few handy tools I keep close at hand when working on my repap printer. Some of these things may sound like a no-brainier, others are handy tips for things you may have lying around your workshop


