How To Decoupage a Table Easily

Decoupage a Table Top
It is easy to learn how to decoupage a table top quickly and easily. I am basically impatient with crafts and most projects, and usually seek to find the quickest and easiest ways to accomplish all tasks. It goes without saying that I want a good final result. My instructions are generally short and to the point thanks to my impatience.This quick and easy method does not work for everyone, but those who share my impatience will appreciate my sharing of how to do things quickly and have satisfactory results.
My work table

What You will Need
- A clean table top
- Elmers White Glue
- Water
- A plastic bowl for mixing
- A wooden spatula
- A two-inch wide bristle brush
- A popsicle stick
- Paper towels
- Magazine pictures, maps, old menues, photos,color papper, old letters
- Clear Arylic Gloss Coating or any other suitable finishing solution
Lather on the glue

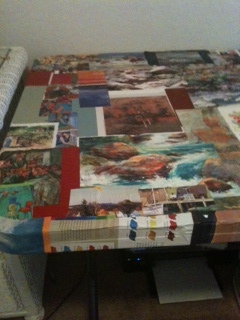
The Table in Progress


Instructions To Decoupage a Tabletop
- Clean the table thoroughly with soap and water. Dry completely.
- Cut all the pictures that you want to use. Don't worry about rough edges as you can cover with another piece of paper or picture.
- Arrange the pictures on the table in any fashion. Make sure to overlap and do not allow empty spaces.
- Take a picture of the table so you can follow the pattern.
- I didn't follow step four, but felt I had to show some patience and care. I roughly cut the pictures and just started gluing them randomly. I always take chances like this, however if you are a meticulous person this will not work for you.
- Remove the pictures from the table.
- Set up another table and cover it with newspaper.
- Mix your special glue with three parts Elmer's glue and one part water. Other recipes call for equal parts of glue and water, but I found this combination worked well for me.
- Start at one end of the table and go across. Carefully lay your picture right side facing down on the small table and brush a generous amount of glue on the back.
- Carefully lay the picture on the table and using your fingers press the picture from the center outward. Use the popsicle stick to remove any bubbles or wrinkles.
- Follow this process until the table is complete except for the border of the table.
- Allow the glue to dry for several hours to make sure it is completely dry.
- Cut long strips of pictures or plain paper. Measure this piece to be sure it just goes over the edge and will fit under the table. The corners have to be done very carefully to avoid wrinkles. It does take some practice to get the corners smooth, so you may want to experiment with a corner of a box.
- Glue the strips all the way around. If the corners are square you just have to meet at the point of the square corner.
- Give the table a final coat with the glue mixture over the top. After it dries give it one more coat to seal it well.
- If you are new at decoupaging experiment with a piece of cardboard or an old table.
Finale for the Table Top
I did my painting table for my first attempt. I also decoupaged a coffee can for my paint brushes. The table has some wrinkles and not perfect edges, but all in all it looks pretty nifty and colorful. To seal the paper spray the table with the Clear Acrylic Gloss Coating--two coats.
You can pat yourself on the back for learning how to decoupage a table top easily.
Other Craft Ideas
- You Can Make Beautiful Gift baskets To Give for Gifts
You can make your own beautiful gift baskets. Find supplies at a hobby shop. People love receiving these gift baskets. - How You Can Clean and Organize Your Craft Room
Craft rooms are wonder places to lose yourself for hours doing what you love. It helps to keep it organized which will inspire your creativity. - Crafts With Kids on Rainy Days
Make alphabet cards with your kids.This is one of many fun crafts with kids. And you can pick the craft up at a later date and add new pictures. - Ways to Decorate your Studio Apartment
It takes time and effort to create a comfortable and attractive living arrangement in a small space. You will enjoy finding ways to decorate your studio apartment. - DIY Decorative Pillow and Towel Ties
These pillow and towel ties decorate a room with color and design. They are easy to make and have many uses.


