- HubPages»
- Arts and Design»
- Graphic Art & Design»
- Design Software
Free Adobe Photoshop Tutorials- How to Color a Sketch

Do you love sketching? Is it one of your favorite pastimes? Ever since I was a kid, drawing has been one of my most loved activities. The feeling of satisfaction after creating a work of art from scratch is ecstasy to me. Sketching is not hard unlike what most people think. Just set your hands free and let each stroke express what you feel and your imagination.
Don’t simply call it a day after finishing your sketch. Why not color it? Doing so will make your art more vibrant and exciting. Can you imagine the world without colors? Are you interested to know how to color a sketch in Photoshop? I’ve searched for Free Adobe Photoshop Tutorials online but I can’t find a complete and detailed one about this matter so I decided to make one. I’m not a Photoshop expert yet I hope this tutorial can somehow encourage each reader to learn and explore this interesting application with me. Are you ready? Let’s begin!


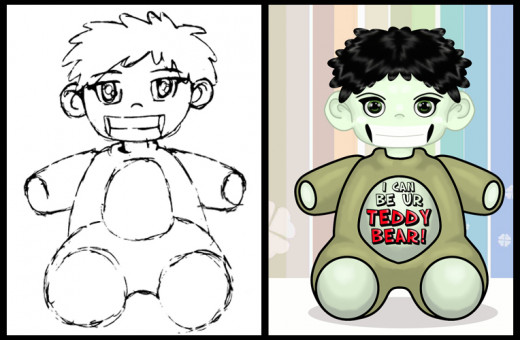
Start by scanning your sketch. Don’t worry about having an old scanner since you’ll only use the scanned picture of your sketch as a guide. Open it with Photoshop. Cut half of your sketch by using the Marquee tool as shown in the picture. Doing so will assure that your output will be symmetric. It can also cut the effort and time required to accomplish this task in half. After selecting half of your sketch, right click while the marquee tool is still on and press Layer via Copy. This will create a new layer with the only half of your sketch included.


Let’s start coloring! The hair is not a problem since its just plain black. Simply use the brush tool while following your guide. My sketch has rounded hair so using the Shape tool is also a good idea. Just create multiple black filled circles and adjust them to fit the hair portion. Coloring the model’s face is best done by creating a round shape by using the Shape tool and warping it to achieve the desired form. Cut the excess parts through the marquee tool. The bear costume is a bit tricky. Using the warp tool is not possible in this case since its shape is a bit complicated. Plainly using the Brush Tool is not a good idea either unless you’re really good at free hand painting. The best option we have is by using the pen tool. This technique is like creating a vector. Remember to toggle the auto-fill option in the Pen Tool before you trace.


Next up is the eye. Create a base black filled circle with the Shape Tool. Trace a shape which corresponds to a person’s eyelashes using the Pen Tool. Merge the two layers. Create a new circle on top of it. Add a gradient effect with the colors and settings seen on the picture. Create a black filled circle on top of it and merge them. Below the newly merged layers, create a white filled circle which serves as the white portion of the human eye. Add two small circles within the second merged layers and set their transparency to about 75%. Add more details while using the Smudge Tool to achieve a fading effect.


After working with our model’s eye, let’s proceed to its smiling mouth. This is very simple as you’ll only need to use the Pen Tool to trace and automatically fill it with colors. Trace the mouth and teeth on separate layers and make sure the first is below the latter.
I find the teddy bear costume very boring so I decided to add a thick border around it. Doing so made it much more vibrant and boosted up to its cartoonish effect at the same time.


Lastly, you’ll need to add shadows and lights. This is a very easy step for expert graphic artists who know the rule regarding basic shades. You can use the preset gradient Tool available in Photoshop but I prefer doing it on my own. Create two layers and name them light and shade. While the light layer activated, use the Brush Tool to paint areas of our character where it should be lighter. Like the center portion of his tummy. Remember that a Radial light is a good way to indicate roundness and to build form. Do the same thing on the shade layer; just use a darker color instead of white. At least 2 dark layers are enough to make your work beautiful. Practice is a must. Looking at realistic photos which can serve as your guide in lighting and shading is a brilliant idea as well. After you’re done, merge all the layers, excluding the background and duplicate the result. Click Edit->Transform->Flip Horizontal. Nudge the layer to the right until the whole image is well portrayed. See? Perfect symmetry and you’ll save a lot of time doing all the coloring and shading as well.

That’s it! Coloring a Sketch in Photoshop is more fun if you did it while using the sketch made by your kid or close friend. Impress your loved ones and make them happy. Teach it to your kid! The steps are pretty simple so even a grade school student can go over the process with ease. I hope this tutorial helped you enjoy Photoshop and appreciate its importance even more! Have a great day everyone and have fund coloring your sketch through Photoshop!


Are you looking for a proven effective way to earn passively online? Join Hubpages now and take the first step towards making your dream a reality! It’s simple, easy, fun, and free! Click here to register.

- How to Cartoonize Photos in Photoshop
Cartoons are famous for their vibrant colors, lovable personalities, and humorous acts. Who in the world don’t know Bugs Bunny or Mickey Mouse? Their fans worldwide are not only limited to kids since most adults find them very entertaining as... - A Guide on How to Build Your Own PC
Building your own desktop is not easy. This is true particularly for those who lack both experience and knowledge regarding this matter. To help you go around this task with ease, this article will discuss a few steps that must be followed. - How to Survive A Zombie Attack ( Tips And Tricks)
What if zombies suddenly roam the street one morning? Is there something that you can do to survive their onslaught? This article will provide a few basic yet effective steps for you to survive a Zombie Attack. - How to Lose Weight Fast After Pregnancy
Every woman wants to be pregnant at some point in their life. It’s a life changing event that could entirely overhaul a woman’s maturity and priorities. Although I’ve never been pregnant, a close friend of mine recently gave birth to a baby... - How to play DOTA like a Pro
Defense of the Ancients is a famous World of Warcraft 3 map played by millions around the globe. This map even inspired other game companies to create versions with better graphics but somehow the same gameplay concept. Probably the most interesting.


