The Crafty Aunt: Sharing a Love for Crafts with the Next Generation


Creating Crafts With Kids
I've always enjoyed making things. Growing up, I got different kits for birthdays and Christmas. Everything from embroidery to paint by numbers to Shaker Makers. There is something satisfying and relaxing (most of the time) about making something with your hands.
I've been given the opportunity to share my love for creating stuff with my nieces and nephew. We've tried all sorts of things from spin art to bees wax candles. Nothing is more fun then clearing off a table, breaking out the craft supplies, and making a mess with the kids. I get so much pleasure out of sharing that joy with them.
I have a confession to make though. All these different things we try out....I pretend it's for them. But it's really for me. I'm the one who's eager to make something. The kids are just a sorry excuse to do it.
I'm going to highlight some of the projects we've completed. I hope you enjoy the collection.
Five Things to Know About Me and My Crafty Ways
- I'll try any creative project as long as it doesn't involve drawing because I can't draw to save my life.
- I like adding my own touches and trying it "my" way.
- Almost every time I worked on a project with the kids, I screwed something up.
- I am the slowest stitcher on the planet. Even before arthritis, I was known to take 2-3 years to do a piece.
- The one thing I'm especially known for in my family is making paper snowflakes.
I've Always Loved Making Things
Every since I was a child, I have loved making things. I loved when we did arts and crafts at school. Popsicle sticks, clay, yarn...it didn't matter. I got into to it whatever the project was. I still have the plate I made my folks for Christmas one year. It still admire it's poorly drawn design.
I always asked for different kits for my birthday. I worked my way from finger paints to cats tail coasters to string art and cross stitch. If glue or needles were involved, I was there!
As an adult, I mostly enjoy embroidery, cross-stitch, long stitch, and plastic canvas. But, I'll give any project a try at least once!
My nieces and nephew and I have tried our hands at so many different things. Some I had never tries. Others were childhood favorites that I remembered (with the help of the web). My nephew and I even built a battery powered wooden robot one Christmas vacation.
Unfortunately, I've got arthritis in my hands, so my stitchery days are over. That doesn't mean I can't do other crafts. I just have to be a bit more selected. Lately, I'm more of an assistant to my youngest nieces than in their doing it myself.

What My Grandma Taught Me
My Grandma came to stay with us each Christmas. During Winter Break during second grade, she sat down with me and taught me embroidery. Not to be outdone, my brother sat in on the sessions as well. She showed us how to do simple stitches like cross stitch. Then taught us how to do back stitches, split stitches, and French knots. The rest I learned on my own over the years.
She gave me a very simple project to work on. It was a tablecloth. It was somewhat monotonous but the point was to teach me how to follow a pattern and perfect a basic stitch.
I remember when I finished, I put it in a shoe box and took it to school for shoe and tell. I was so proud of what I had accomplished.
I made several after that. Unfortunately, this is the only one that has survived my early years. It's a bit battered, but you would be do if you'd been handled by an 8 year old.
Get Started With Embroidery!
Embroidery may seem old fashioned. Perhaps it is. But, it's one of the easiest ways to relax in the evening while watching television. Busy fingers distracts a mind filled with the hustle and bustle of a long day.
If you're thinking of learning embroidery or teaching a child, it's best to start with a sampler or a simple project with very few types of stitches needed. A sampler usually has examples of different types of stitches but the pattern is simple enough that a beginner can do it.
If working with a child, choose a pattern they find cute. Animals are usually a safe bet. Just don't pick anything too intricate. It is better to start simple.
These are Some of the Things I've Made
Stamped Not Counted

Yarn of Different Lengths

Two of the Many Rugs I Made

I've Tried My Hand at Some Different Things
Cross Stitch
After working so many years on embroidery, cross stitch was a pleasure to do. I like the simplicity of the stitches, but the necessity to be accurate. Lopsided x's with throw off the whole design.
I prefer working with stamped patterns rather than counted cross stitch. I just can't pay attention that long! I have a beautiful endangered animal counted cross stitch picture that I never finished. Somewhere in the middle I messed up the count and I got frustrating. I don't even know how to make it work out now.
I completed this project in 1991.
Long Stitch
I haven't seen long stitch kits in a long time. Do they still sell them? They were pretty popular when I was in my teens and 20s. I enjoyed this variation, though they really weren't very challenging.
This long stitch project was fairly easy to complete. It has a nice blended affect despite the simplicity of the stitches. I am a fan of panda bears so I held onto it.
Latch Hook
When I was a teenager, latch hook rugs were all the rage. I got several small square kits as gifts and worked through them. It took a little coordination to figure out the latch hook without making uneven ends.
After that I bought a few throw rug kits. These were my favorite completed rugs. Both are holding up pretty well after 30 years.
I've been told that latch hook is for little kids now. Whatever. If one came my way now, I might do it just because they are relaxing to do.
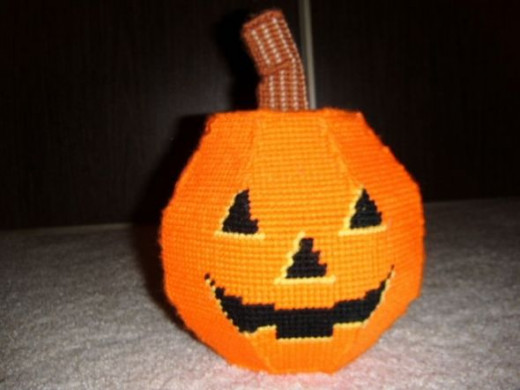
Playing with Plastic Canvas - Fun and Flexible
Do you enjoy making stuff?
No doubt you made a plastic canvas box or bookmark in elementary school. I think we all did. There's so much more you can do with plastic canvas then you'd think! I've made coasters, Easter baskets, bag clips--to name a few things.
This jack-o-lantern was one of the more challenging plastic canvas projects that I attempted. Each slat was stitched with yarn, then was sown together to make the jack-o-lantern shape. It was not easy working at angles. The plastic material is not that flexible.
The stem was particularly tricky with it's round, bent shape. It isn't easy making a rounded object from sheets of plastic!
Creating with the Kids
Let's get messy!
I don't have kids of my own, so I've had to borrow my nieces and nephew. They're an excellent excuse to try different things out. Oh yes, it's for the kids! Ha! Ha! Ha!
It's great to see children work so hard, and then, take such pride it what they've done. They can't wait to show their parents or give their new creation as a gift.
Some of the stuff has turned out great. Others were things only a Mom would love. The important thing was to try different things and experiment. Kids have to exercise their imaginations as well as their bodies.
Not only is it great for the kids as they try different things, but it keeps this Aunt thinking of new things to try.
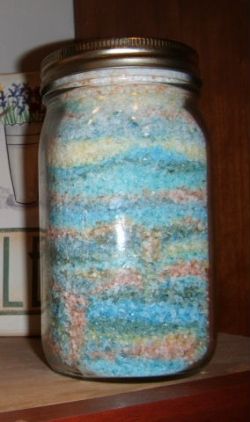
If you'd like to try this one yourself, I've got the instructions on my article Beautiful Bath Salt Gift Jars Craft Project for Kids.
Why Children Need to Create
- It allows them to use their imagination.
- It gives them an outlet for self expression.
- It teaches them how to follow instructions.
- It shows them how to work with others.
- It teaches them motor skills.
- It gives them something to take pride in.
This Is Quality Time
I love nothing better than sitting at the table with the kids working together on a project. Sometimes there's conversation and other times we're too intent on what we're doing.
I love to see how little ones work through their items and explore their world. They may not realize it but there's a little bit of science going on, too. At first they follow directions. But, little by little, they throw in their own variations. There's always so much imagination that goes into everything they make.
It's great to spend this type of quality time with kids. You learn so much from them and about them when you share time in this way.
Some Of The Things The Kids And I Made
Our Melted Creations
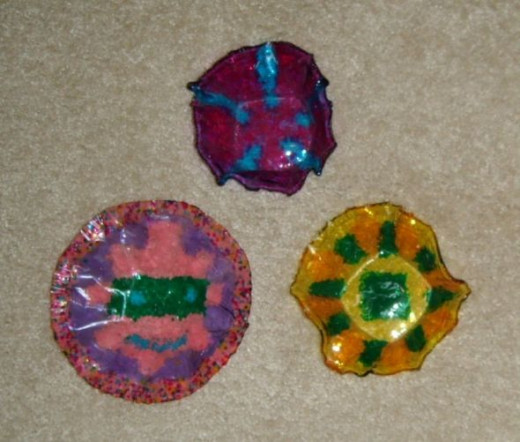

One of the projects I really enjoyed was the Makit Bakit Bowls. I was taking care of my niece a day or two a week after school. This was a simple project that was easy for a kindergartner and her uncoordinated Aunt.
In the box was little plastic pellets that you arranged in a metal pie tins. The pie tin is then put into the oven to melt. When cooled, it forms a solid piece of plastic in the shape of a plate.
You can create different shapes by melting your creation, letting it cool, then placing the solid plastic on top of a soup can or other metal oven safe container and remelting it. These three items were made from one kit.
I made the one with the face. He looks a bit like an overly cheery Teenage Mutant Ninja Turtle.
Note: This project involves using the oven. Adult supervision is necessary for getting the cookie sheet in and out of the oven. The sheet and the bowls are very hot, so take special care.
The Bead Pet Craze
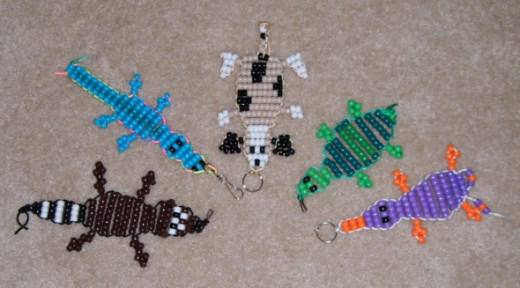
A few years back, bead pet key chains were very popular. People were buying them like crazy. It was Beanie Babies all over again (only they weren't worth anything).
I bought a few different ones. Then, I sat up one night and taught myself how to make them. Once I figured it out, I taught my nieces and nephew. My youngest niece was about 6 at the time and she was incredible good at this.
This is an addictive craft. My niece and I made numerous key chains one summer.
The Magic of Shrinky Dinks
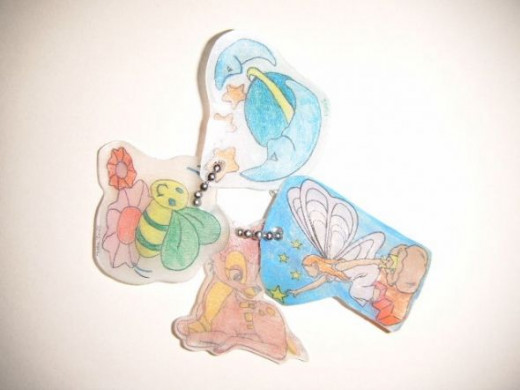
Shrinky Dinks came out in 1973. That's when I was in elementary school. Back then, there was no Shrinky Dink machine. You cut out your shape, colored in the design, then laid it on a baking sheet. Mom or Dad popped it in the oven. Then, you waited for the magic to happen. I made hundreds of these when I was a kid.
The modern rendition includes the Shrinky Dink machine. It works much the same as an Easy Bake Oven. With supervision, a young child can make their own Shrinky Dinks with very little adult help.
When my niece started spending time with me, I bought her the machine. It was good busy work and I enjoyed coloring along with her. I wasn't much impressed with the machine. It was a modified Easy Bake Oven. We found out pretty quickly that if the tray wasn't set right, it got stuck inside. Good thing it ran by light bulb power. It wasn't easy freeing trays lodged inside.
I made three of these key chains. And, I'm not going to tell you which ones.
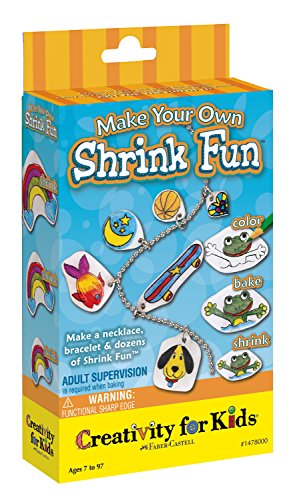
In order to make Shrinky Dinks you don't need much. These are all the supplies you need to make your own. This kit comes with clear plastic, key chains, and color pens. You will need to purchase a hole punch (a hole is needed prior to melting so you can attach a chain when it's cooled).
I recommend making them on a cookie sheet or in a cake pan with foil the pan. Sometimes they stick and this will make it easier to remove them.
An oven is essential, of course! I have seen some instructions for making them in a microwave, but I have not tried this out yet.
Handmade Coasters: Straight from Nature
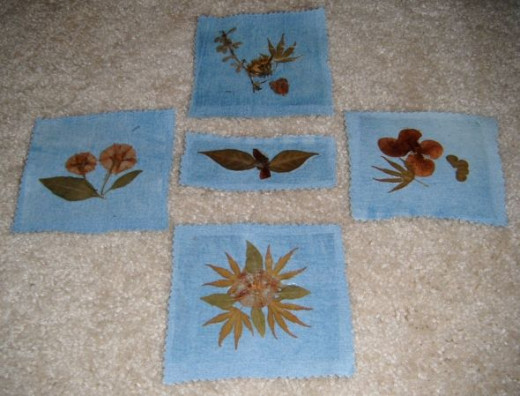
I had a package of computer iron on transfer sheets that were utterly useless to me. I came across this project in a magazine that used plants, cloth, and iron on transfers. It was perfect!
My 6 year old niece and I worked on these together. We didn't do it exactly as the instructions said. You're supposed to pound the greenery into the cloth to make an impression. That was too difficult for both of us, so we came up with our own version.
My niece had a blast hunting through the back yard for leaves and flowers. She enjoyed the time spent arranging everything on the material. I wielded the iron. This was probably one of the most enjoyable days we spent together.
Would you like to give this project a try? I've got the instruction on my article "Easy Flower and Leaf Coasters Craft Project."
Let's Recycle! - T-shirt Bags are Eco-Friendly!
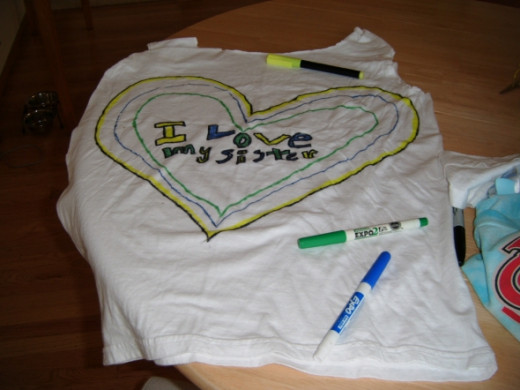
My niece who is 8 spent the night with me once. I was looking for something easy to do with her that would also eat up time. An online friend had posted a link on how to make t-shirt bags. I looked it over and it looked like something that an 8 year old could do. I asked her to bring over a couple of old but clean (can't stress that enough with kids!) t-shirts.
The instructions for this project can be found on this web page: http://www.leethal.net/zine/?p=1344. All you need for this t is a t-shirt and scissors--and marking pens if it's a white t-shirt.
My niece did the one in the photo. Our 10 minute bag project took almost 2 hours. She did the cutting and coloring. I strung the drawstring. We were very pleased with the results!
Thanks for stopping by. If you're a crafter, tell me about what you've been working on or the types of crafts you like to do.