- HubPages»
- Technology»
- Computers & Software»
- Computer Software
How To Adjust The Brightness In Your Videos Or Movies

VirtualDub - An Exquisite Tool For Videos
VirtualDub is a digital video software which is free to acquire and can help in many different video editing purposes. Although it comes with a reputation on being rather hard to use, it is actually a tool which can not only offer fast and easy ways to edit multimedia but also can perform particular actions even easier than other software solutions.
You have surely acquired copies of video files which seem to be too dark in particular scenes; what most people usually do is raise the monitor's brightness or increase the brightness through the graphics card settings. It is obvious that while this is not hard, it sure is inconvenient to a point.
In this particular guide we will show in steps how you can edit videos with too low or too high brightness and change the brightness to a more appropriate level for your tastes.
Step One
Download the application from the link and install it. When installation has been completed, run VirtualDub and load the video whose brightness you need to adjust into the application through File>Open or by simple drag 'n' drop method.
Some video files are not supported, but the vast majority of them are, so you should not have any problems moving further.
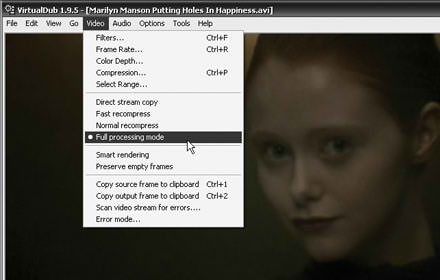
From Video menu, activate Full Processing Mode.
Step Two
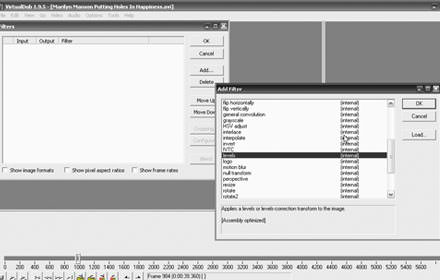
Move on to Video>Filters by clicking on Add. On the new window which will show up, select the filter called Levels and click on OK to add it on active filters.
Step Three
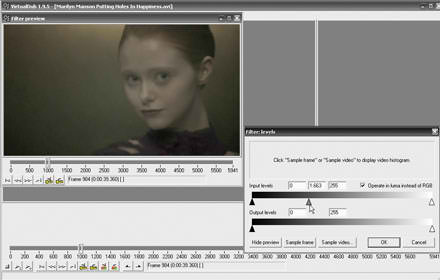
The filter's parameter window will show up; Click at Show Preview so you can get a preview of the video which you want to work on.
If your video is too dark, you need to move the middle slider of Input Levels to the left; if it is too bright, move the slider to the right. While checking at the movie preview for the result, move the timeline bar of the movie to many different parts and keep adjusting the slider to bring the brightness on a desired level throughout the video.
Step Four
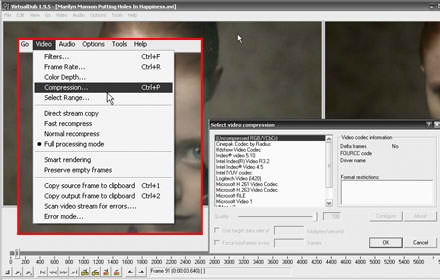
The brightness should have been brought to a good level by now; if you are satisfied with the final result, click at OK to return to previous window. Enter the Video menu and select Compression option. Select the codec of your preference, for example DivX or Xvid or even uncompressed. Be cautious however that an uncompressed video file will result in a huge size of the final file.
Choose File>Save As to save the video with your filename at your path of your choice; the process might take a while since it is relevant on your CPU speed.
- Which Is The Best Selling Mobile Cell Phone Of All Times?
Find out which mobile phone has sold the most - How To BackUp Your Facebook Content In your Hard Drive With 3 Different Ways
Your Facebook activity can be backed up in your system, including your images and galleries and be accessible offline. - Best Choices Of Free Antivirus
You don't really have to pay for a good antivirus. - How To Use Your USB Flash Drive As Added RAM Memory On Windows 7 Through Software
Through ReadyBoost you can assign 1 or more flash drives to be used as system memory, thus increasing Windows 7 speed and overall performance. - Windows 7: Useful Interesting “Hidden” Elements And Applications
Windows 7 include a variety of internal applications which can speed up your work and enhance your productivity.


