- HubPages»
- Technology»
- Internet & the Web»
- Web Page & Web Site Development
WordPress The Basics: Learn To Blog
This is a follow up hub from How To Set-up Wordpress On Free Hosting With Free Domain Name.
Wordpress a great piece of software that is easy and fast to use, it don't take long for you to pick up the basics of using WordPress, i find it a very powerful software that anyone can use, with a bit of training you will be a WordPress pro in no time. Most of the people who use WordPress will usually stay and learn because its really the easiest way to have you own blog or website for free. Plus you will be teaching yourself the basics of building a site also completely for free, without having to pay out lots of dollars on a basic training for website design, this way you can save hundreds or even thousands. Making a site can take a bit of time it can be demanding sometimes and really frustrating, it will also take time for you to learn everything about website building.
The truth is most the time you wont have to know all about website building, i have been teaching myself for around 3 years now and i am always learning something new everyday, it all depends on what you are trying to achieve with the site you are building. What i mean is depending on what your site is about for example: if its a information site with lots of articles, pictures and videos then it will be just as easy as building a hub on Hubpages, you will get more of a choice on how to set-up the look and feel of you site. In the other-hand if your looking to build a website that has more complicated functions like a dating or social network site, then you will find that it will be much more challenging to learn how to do this, let me tell you that it is not impossible to do, but it will take you time up and lots of it. If that is what you need than you are in the wrong place, here in this hub i will show you the basics of how you can have a simple site or blog for free without paying for anything, its just as easy as using this site.
Keep in mind that this is a follow up hub for How To Set-up Wordpress On Free Hosting With Free Domain Name. So if you have not read my previous hubs on how to get a free hosting and domain name, then i suggest you check them out, i will post the links at the bottom of this page. As it explains how you can get a free hosting account for WordPress, to run WordPress you need a hosting account and a domain name.
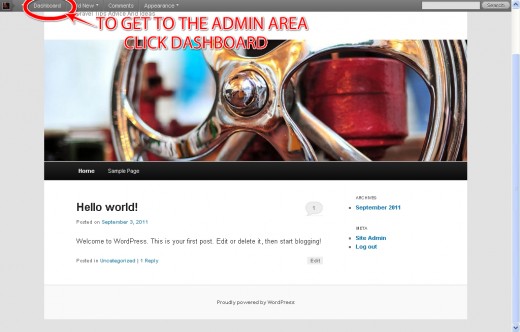
Okay lets start at the point we left off in the hub How To Set-up Wordpress On Free Hosting With Free Domain Name in this hub i showed you how to install WordPress to your free hosting account which left us off at this stage have a look at the picture below:
Front end
Wordpress default theme:
Okay this is where we left off at this screen, everyone who installs WordPress gets a default theme already set-up ready for you to start blogging, but it is best to change you theme or at least your header which is the big banner on the top of the site. The default theme is really good for beginners to use, because you can change the background colours, the header, the layout, link colours, colour schemes all in a touch of a button.
In the picture above, this is like the front end of your blog when you type in you website address this is where it will take you. To make changes to the layout and start posting some articles, you will have to go to the back end (admin area). How do you get there, by going on the dashboard, in the picture above there's an example of how to get there.
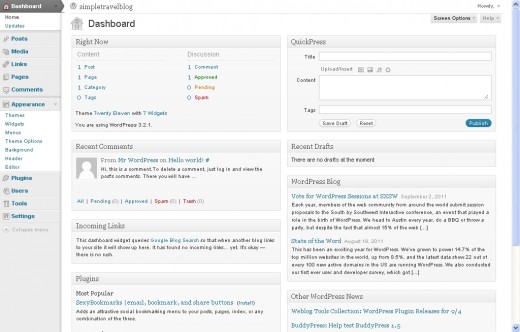
Once your on the dashboard it should look like the picture below:
Back end Admin area
In the picture above
This is the admin area where you control everything on you blog, okay first of all let me introduce you to the back end.
Posts: Where it says posts this is where you write your articles insert pictures and video to them then publish them to your blog. You can write as much as you need to, you can use html in the posts and much more. Here you can manage the categories that you publish your post too.
Media: Here is where you find the pictures and videos you have uploaded to you site and posts, basically its a library for all your media files.
Pages: On here you can make a page or manage the pages that you have made for you site, for example: the Home page of your site every site needs one, here you can add as many pages as you need. Pages needed for a site are home page, about us page, contact us, sitemap and whatever else you add on in the future to match you sites content.
Comments: The comments option is where you monitor the comments that people leave you, here you can approve or disapprove a comment from being showed on you blog. You can also reply back to the person who left you a comment straight through this option.
Appearances: Okay in this option you can do many things that will help you blogs look and feel the way you want it too. When you go on this option you will notice that there are roughly about seven sub-options in the order of:
-
THEMES: here in the themes option you will be able to choose a different themes for your WordPress blog, it is easy to choose a different theme all you do is search for what you want, for an example lets say you wanted a blue and white theme, well you would simply type this in the search box, browse through the results pick the one you like then just press install, WordPress does this for you automatically with a few click of the mouse. There are thousands of themes available for WordPress, most of which are search engine friendly.
- WIDGETS: widgets many people ask me what are they, all a widget is fancy word that WordPress uses for tools or content that you can add, arrange, and remove from the sidebars of your blog, all a widget does is make it easier for you to customize your blog, and acts as a short-cut sometimes. There are also thousands of widgets available for download, like the Facebook, Twitter, Myspace,Digg etc.
- MENUS: make your own custom menus for your featured or article of the day, maybe you special offers.
- THEME OPTIONS: in the themes option you can change the colour scheme of the blog, most themes will let you choose any colours but there are others that will only let you choose from a set-amount. You can change the link colours to one of your choice, maybe to match the colour scheme. You will also be able to choose the layout of the theme, in case you want it to be a right hand theme which is a theme with the sidebar on the right, if you want it on the left then you can, you can also choose to have a sidebar on both sides.
- BACKGROUND: change the background colour of your blog, i recommend you to do this as it will make it look unique from all the other blogs. Really you should customize you blog as much as you possibly can.
- HEADER: upload your custom header or headers, some themes will let you have a rotating header. A header is the top banner that will display your blogs name and a small description of what your blog is about.
- EDITOR: this area is for editing the whole layout of the blog, you must have some basic knowledge of css, html and php coding to understand what is going on in this area for you to be able to make any changes without messing with the important coding. But if you are new to all this don't worry, you haven't got to touch this area, unless you are looking to build a more complicated site than a info blog.
Plug-ins: Okay plug-ins are like a piece of software, that basically is a add-on to your website, you can make your blog do what ever you can imagine with a plug-in. There a thousands of plug-ins available for the WordPress platform, let me give you some examples of some good plug-ins:
WP-Touch: This plug-in will automatically turn your blog into a iPhone application, its simple powerful and works on almost every theme. This allows phone users to be able to display your site through there phones. You can add a social networking plug-in to your blog called Buddypress, if its not a social network you are after then get a forum plug-in and let you visitors discuss there problems with each-other. Facebook, Twitter and so on, you will find any social networking site offering a plug-in for WordPress completely for free, as this is the whole point of this tutorial to just introduce you to WordPress. There are lots of plug-ins, i guarantee that you will find something that you want to add to your blog with ease, just remember what ever you want just type in the search box.
Users: here in this option is where you control the users of the admin area, this is the people that have permissions to change you blog or publish content. You can have more than one person that is allowed to make changes to you blog, but i would only let people do this if they are my business partner or someone that writes with you on the blog. Don't give no one else permission.
Tools: this option is not important, it just gives you little tools that help you build your blog faster, i recommend you take your time with the blog.
Settings: in the settings menu the are other sub-menus which i will guide you through them below.
- GENERAL SETTINGS: in this setting you can add things like the site Title, the Tagline which is where you add a small description of you blog, the website address, your e-mail contact address, membership option here you can choose to let your visitors register to you blog, you will find the date and time setting here in the general settings.
- WRITING: here you will be able to control the size of the post box that is displayed at the home page, you can choose where and to which category to publish your posts to and also set-up an e-mail posting service, so you can post to you blog with an e-mail you can also do this with a android or iPhone.
- READING: set what your home page displays, like blogs or a static page which is a bit more like a normal websites home page.
- DISCUSSION: set your own preferences like, let people comment on you posts or don't you choose. Get comment alerts every time someone leaves a comment on your article. Choose to approve a comment automatically or block for approval from you only.
- MEDIA: here you can choose sizes for pictures and videos that you insert into you published articles, i recommend you leave this at the default option which is roughly 150 by 150.
- PRIVACY: this is a important option, if you choose no then your site will not show up on Google searches, you must leave this on to get noticed on Google and other search engines.
- PERMALINKS: if you are new to this, just leave this setting on default mode, as you learn more about permalinks you will be able to change this when ever you like.
Now that you are familiar and have learned the basic of WordPress have a look at some videos to further help you in understanding this powerful piece of software that is completely free to use.
My next hub we will discuss more advanced procedures and will show you how to change your theme, how post, publish, insert pictures and videos. Will show you how to organise your articles to make everything look nice and well presented.
Links to other related hubs.
- Free Website Hosting And Free Domain Name With No Ads
Right, free web hosting, as you probably know most of these company's are financed by adverts that get displayed on your site by the hosting company, when you host with them. Free hosting is also one of the most basic service that you can find on the - How to set-up free hosting and domain
In my recent hub free hosting and domain name with no ads, i showed you where you get a free hosting account with 000host.com, also a free domain name with Dot Tk and the FTP program, this time i am going to show you how to link these two services to - How To Set-up Wordpress On Free Hosting With Free Domain Name.
In my last two hubs we talked about where to find and how to set-up a free hosting also a free domain name service. In the first hub i showed you where to find a free hosting service that don't display forced ads on every single page of you website o


