- HubPages»
- Technology»
- Computers & Software»
- Computer Software»
- Digital Photography & Video
How to Blend or Merge Photos


To blend or merge photos you need to have image manipulation programs such as Photoshop or GIMP. There are numbers of ways to blend or merge photos in Photoshop. You can blend photos automatically as well as manually.
Automatically Merging Photos in Photoshop
The Photomerge and Merge to HDR are two commands in Photoshop, which automatically merge two or more photos.
Photomerge
Photomerge command allows you to stitch many photos and create a single photo. You can merge photos and create a panorama using Photomerge. This works best when you have images from continuous shot. To Photomerge, go to File – Automate – Photomerge, and Browse images that you want to merge.
Merge to HDR
Merge to HDR command in Photoshop automatically merges photo and creates High Dynamic Range image. However, the images you choose to merge must be of same size. To Merge to HDR, go to File – Automate – Merge to HDR.

Tutorial #1: How to Blend or Merge Photo
In this tutorial, I will show you how to blend or merge the entire photo with another photo.
Open the photos you want to blend or merge.
Create a new document.
Copy/Move the first photo in the document. You can use Move Tool or copy paste option to place the photo in the new document.
Copy/Move the second photo in the new document and place next to the first photo. Photos must overlap.
Select Rectangular Marquee Tool.
Set Feather Radius around 15 pixels.
Drag the cursor and select an area between the two photos.
Hit delete.
Scale the photo if it does not fit to the document.

Add texture and Texts to your Image
After you have blended photos, you can add texture and text to your image.
To add texture, open a texture file, copy and paste on your image.
Scale the texture to fit on the canvas.
Go to Blending Options and select Multiply as Blending Mode.
Lower the opacity.
To add text, select Text tool, write whatever you want. Give some color and style to your text.
Tutorial #2: Blend or Merge Photos Using Blending Options
In this tutorial, I will show you how to blend or merge certain part of the photo with another photo.
Open the source photo. (The photo you want to blend or merge with another photo)
Use any of the selection tools to select an object in the photo that you want to merge with another photo. I use Quick Selection Tool. While using Quick Selection Tool, if you overdo selection, choose subtract from the selection tool, on the menu ribbon, and click on the area you want to subtract. If you want to add to selection, choose add to selection tool. You can differentiate these tools on the menu ribbon with + and – sign on the selection tool icon.
Alternatively, you can also erase unnecessary parts from the image instead of using selection tool.
Open the destination photo, the photo where you want to place an object from the first photo.
Copy/Move the object from the first photo.
Press Ctrl T to Transform the object. Drag from the edges to scale the object. Hold Shift while dragging, to maintain the aspect ratio.
Select Blur tool, (Choose Soft Brush and set Opacity around 50-70 percent) and blur the edges of the object. Or, select Eraser Tool, with soft brush, and fade the edges.
Go to Blending Options (Drop down menu on layer palette) and choose Soft Light as Blending Mode. You can experiment with other Blending Modes.
Lower the Opacity.

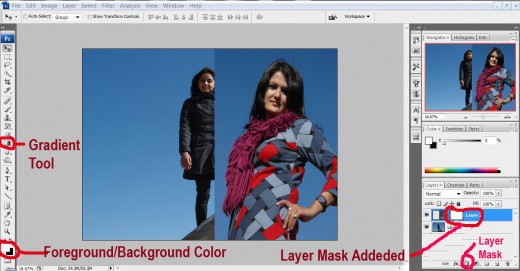
Tutorial #3: Blend Images Using Layer Mask
Open the photos you want to blend.
Put the images side by side in a single canvas using move tool or copy and paste option. You can do this either by creating a new canvas and moving two pictures in the canvas, or pasting one photo on the another photo. However, you must remember the pictures must overlap.
Select Add Layer Mask option from the bottom of the layer palette.
Select Gradient Tool. Choose Linear Gradient style. If you have put your pictures vertically, choose white upon black option, if the pictures are horizontally arranged, choose black upon white option.
Drag the cursor horizontally from the middle of the second photo to the center of the canvas if pictures are arranged vertically. Drag vertically, if the pictures are in horizontal order.
Two images are blended together.

Select Brush Tool, with Opacity 50 percent and Flow 100 percent.
Gently brush over the subject in the second image to bring back the details.


If you want to do some more editing, click Create a new fill or adjustment layer icon on the bottom of layer palette. Select Solid Color option and choose color.
Go to Blending Options and choose a Blending Mode of your choice. You can lower your opacity if you want.
You can also use other options such as Brightness/Contrast, Hue/Saturation (Ctrl U), Color (Ctrl B), Curve (Ctrl M) or Level (Ctrl L) to enhance your image.

Tutorial #4: How to Blend Photos Using Blending Modes
Open the photos you want to blend.
Create a new canvas and copy/move your photo to the new canvas.
Move/copy another photo and place upon the first photo.
Go to Blending Options and choose Blending Mode of your choice. Lower the opacity.
If the photos are not blending together, click Add Layer Mask option. Make sure your foreground color is black and background color is white.
Select Brush tool, Opacity and Flow 100 percent, and brush over the parts that you don’t want to appear in your image.
You can blend as many photos you like.
If any of the photo is not blending as good as it should be, go to that particular layer, click Filter – Bur – Gaussian Blur. Set Radius around 3-7 pixels.