- HubPages»
- Arts and Design»
- Drawing»
- Drawing Tutorials
Create an Architectural Rendering
Create This Finished Product
Get Creative!
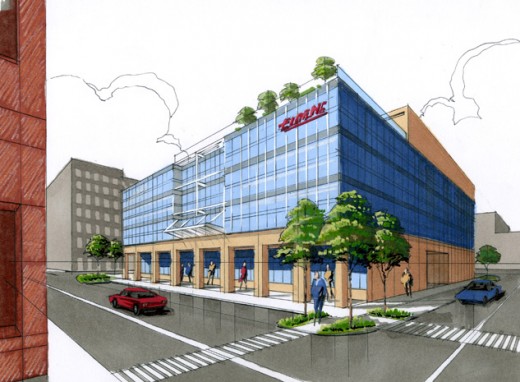
Have you ever imagined yourself creating one of those 'artist's conceptions' of a new building, landmark or monument? Or are you hoping to create an impressive building sketch, drawing or watercolor? Well, creating an architectural rendering may not be as difficult as you might have imagined. Follow along, as this architect and renderer gives you some helpful, straightforward and easy-to-follow hints on how to proceed.
Step No. 1
Begin With 'Stacked Shoeboxes'
With just modest drawing ability, you should be able to put together a very credible rendering or 3-dimensional building sketch (or an interior scene). The place to begin, of course, is with a rudimentary perspective diagram.
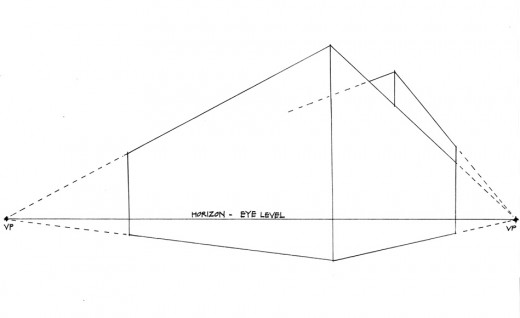
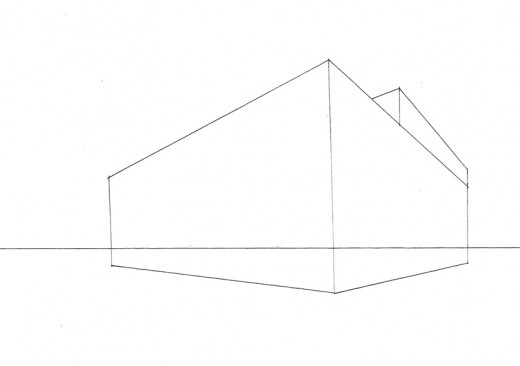
To recreate the rendering heading this article, we will first create a relatively simple and boxy building, seen primarily from below. (Buildings always appear more dramatic when seen from below, and that's how most of us view them anyway.) Begin by drawing a flat straight horizontal line all the way across your drawing from side to side about 1/4 the way up from the bottom of your drawing. That line becomes your horizon line; it is also eye-level. When we look out at the horizon, everything that falls exactly on our line of sight appears to be at eye-level. Mark a left vanishing point (VP) on that horizon line at extreme left, and a right vanishing point (VP) at extreme right. These are the points to which all things receding will appear smaller and smaller until they vanish. (Think off railroad tracks or a highway vanishing to a point on the horizon.) Now draw a box slightly off-center between the two vanishing points. (Imagine you are staring at a shoe-box in extreme close-up.) The box's top and bottom edges should be aligned to eventually 'vanish' to the vanishing points, and its other edges should be vertical. Placing this box slightly off-center makes it more interesting visually; items exactly centered usually appear boring and static. Making your box slightly asymmetrical also adds visual interest, as does the thinner box (or upper floor) stacked on top. If you have replicated this drawing faithfully, you will in fact have a slightly distorted, rather than true, perspective; note how the very front top corner (or 'prow') of the building seems to spike quite high into the air, more so than it would in real life. I've done that on purpose — that, too, will make our final rendering a little more dramatic than reality (that's called 'artistic license').
Without the vanishing points, labels and the extended dashed lines, your base drawing should now look like the one below.
Step No. 2
Now Add Some 'City' and Detail
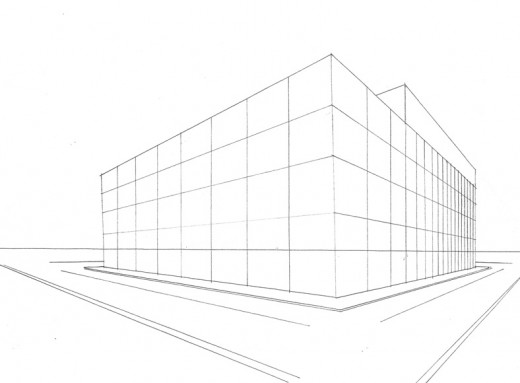
Let us now root our floating box into the landscape of a city. And let's give it some actual building detail as we proceed. Begin by radiating lines from each of the two vanishing points that might, in succession moving away from the base of the building-box, suggest a sidewalk along each face of the building, then a zone for parallel street parking beyond the sidewalk along each face of the building, and then a double-center line for each street running past each face of the building. Your streets, parking zones and sidewalks should all taper and recede in the distance toward the vanishing points. See the drawing below for guidance.
Next, mark off four different floor heights on the leading vertical edge of your building-box. Note on the drawing below that I have made the top three floors equal, yet each lower in overall height than the taller first floor. This happens to be the way most office buildings, hotels, retail centers, libraries, etc., are actually built. The first floor, which often contains the public spaces of lobbies, restaurants, reading rooms, and the like, may be 1-1/2 to 2 times as tall as each of the upper floors. After you've marked off these floor heights, you can then draw floor lines that wrap around the building-box (like ribbons or stripes), also receding toward the vanishing points as they continue across the façades of your building-box.
Then proceed to draw a series of vertical lines that subdivide those façades into equal-looking vertical strips, creating an overall grid. Remember to make those vertical strips of façade widest at the forward edge where they are closest to the viewer, and narrower and narrower as they recede into the distance and are farther away from the viewer.
When finished with this step, your drawing should look something like the one below.
Step No. 3
Have Some Fun!
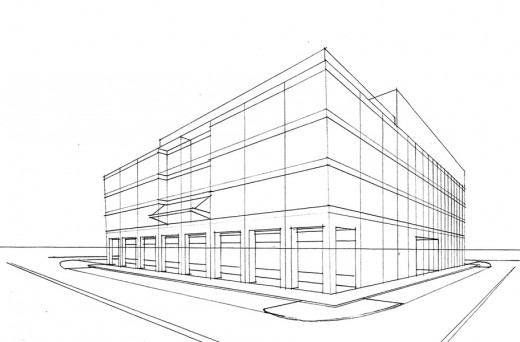
Now the real fun begins! We will add particular details to our evolving building to give it some visual interest and character. First, add a second score-line at each floor level, a slight distance from the first floor line, to give each floor some thickness and definition. Then, create a covered arcade along the first floor of the left building façade, by punching rectangular openings that rise through most of the first floor height. Note that the newly recessed front wall of the building that you will create, with its storefront windows and arcade ceiling, must all follow the same receding lines back toward the left vanishing point. Also, the right side facets of the newly created arcade columns must recede back to the right vanishing point. A simple rule: when drawing something in 3-D, you have only 3 elements controlling your drawing: left vanishing point, right vanishing point and vertical.
Continue by adding the slightly pushed in recessed notch of the middle two bays of the left façade above the arcade, along with a funky sloped-glass canopy hanging off the building. Place a narrow perimeter clear glass guardrail wall around our soon-to-be roof garden atop the forward roof, and punch a hole in the first floor at lower right for some visual interest on the right façade.
Finally, to help complete the street intersections, draw in the quarter-circle 'islands' at the three visible building corners; these will receive landscaping and crosswalks in our later stages. Your drawing should now look something like this:
Step No. 4
Add Color and More Detail
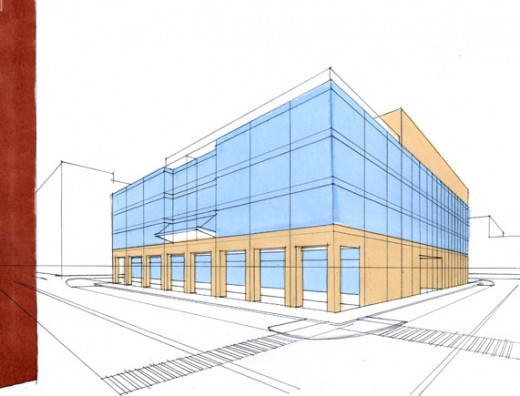
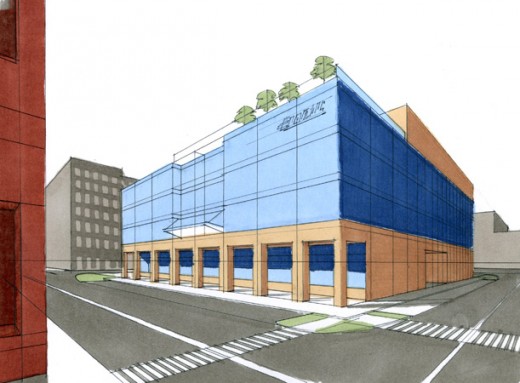
We are now well into 3-D, so let's add some color to begin suggesting the building's materials. Assuming our building to be glass curtain-wall for its top three floors, we'll add a tint of light blue to those floors. That same light blue tint goes onto the storefront glass along the pedestrian arcade as well. The sloped-glass canopy remains untinted; we can wait until a later stage to decide how it should eventually look. To suggest a solid building base of perhaps cut stone, we'll add a light beige tint to the first floor structure of our arcade, and to the long blank walls at first floor right. Adding that same light beige to the blank partial top floor we placed atop the rear of the building adds a bit more visual interest and ties the building together nicely.
And, because our drawing has a rather gaping void at extreme left, where everything seems to be receding to the vanishing point — potentially taking the viewer's eye with it — we will add a bold stroke of reddish-brown running vertically down the drawing, thereby cutting off that vanishing no-man's-land. This reddish-brown will become the very edge of a foreground building that just happens to nicely frame our view.
To further ground our building, we will also add a mere suggestion of other city buildings in the background: just enough to add verisimilitude without stealing any attention away from our building. And let's become pedestrian-friendly, by adding two crosswalks radiating from the quarter-circle island near the rendering's center.
If you're working along with me, you should now have a drawing resembling the image below.
Step No. 5
Sunlit Drama
We will now look for opportunities to heighten the drama and impact of our rendering. The first way is to choose effective sunlighting. To fully focus attention on our more intricately detailed and visually dynamic left façade, we will hit that building face with strong direct sunlight, throwing the right façade into shadow. We therefore deepen the blue and the beige along all the right-side facets of the building and the arcade columns. We also throw a deep blue shadow onto the storefront glass within the arcade, and fill in the low sill wall below the storefront glass as stone.
The same gray tone that defines our streets and parking zones can also serve as our building and column shadows thrown onto the sidewalk. Varying shades of gray render the bland buildings in the distance. (Note: I purposely chose a rather nondescript and dated looking window pattern for the building at left rear, so that the contrast would make our building look even newer and more modern.)
A light tone of green identifies our small patches of landscaping, and fills out our newly sketched roof garden trees. (See how much additional visual drama and interest are created merely by planting four small roof trees? They pull the eye skyward, causing the viewer to notice our building's rather interesting skyline.) To draw even further attention to the high portion of the primary façade, let's sketch in the beginnings of a building sign against the upper floor glass.
Finally, our tall vertical red-brown stripe at left has now been gridded and detailed to suggest a lower floor of a neighboring building. The penultimate stage of your rendering should now look like this:
Step No. 6
Specific Details Add Charm & Realism
All that is left are details, but oh what essential details they are. It is most often the final details of a rendering that will make it come to life.
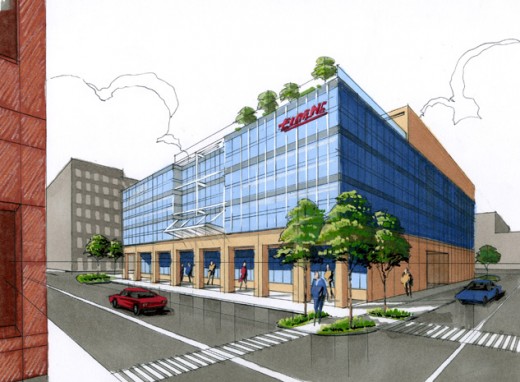
We begin at the top, with just the merest suggestion of a cumulus-cloud sky in the fine linework that arcs behind our building. Note that I have allowed the prow of our building, with its roof garden trees and sign and detailed glasswork, to dominate, by breaking through the lines of the clouds beyond. Next, our rooftop trees and the newer trees in the landscaped islands at the street have all been detailed and embellished, as have all the plantings along the sidewalks. The building sign has been completed (though it has been 'greeked', or left as indecipherable jibberish, so we don't infringe on any real business' or office building's name or trademark). The glass walls have much greater definition, through tonal variations and an added layer of window mullion gridwork.
The building notch and sloped canopy have now been completed, adding more sparkle and fine detail to draw the eye. Pedestrians now stroll the arcade, sidewalks and crosswalk, adding a much-needed human scale, as well as spots of occasional color. The cars add gravity to the street, and a bit of roughened texture at left turns the neighboring red-brown building to stone. Voila! We have a completed rendering!
Step No. 7: Finis!
- Designing Parking Lots
With virtual seas of asphalt seeming to stretch from horizon to horizon, some would say we have sacrificed far too much of our world to the automobile. But the effective design of parking lots is essential to the proper functioning of 21st Century... - Cleveland's Justice Center
The City of Cleveland/Cuyahoga County Justice Center is a substantial development in neo-Brutalist... - Crocker Park, Westlake, Ohio
An impressive lifestyle center with high-end shops, restaurants, bars, offices and apartments. Opened in 2004, Crocker Park in Westlake,... - Cleveland's Key Tower
When this office tower was completed in 1991, it became the nation’s tallest structure between New York and Chicago. Even today, after recent building booms in Hong Kong, China,... - How to Draw (Sketch)
There are those who feel they can't draw a straight line to save their lives. Others think they have no talent for art at all. - Nautica Pavilion, Cleveland, Ohio
Situated below the Cleveland skyline, on the western bank of the Cuyahoga River, the Nautica Pavilion offers a unique and enjoyable summer entertainment venue. The Nautica... - Enjoy the Bahamas Junkanoo Festival
Junkanoo is to the Bahamian Islands what Mardi Gras is to New Orleans, and what Carnival is to Rio. A traditional cultural celebration dating back to the time of island slavery,... - Double Glass Walls in Architecture
We’ve all heard how important it is to use double-glazed or even triple-glazed windows in our homes and offices to reduce energy demand and improve interior comfort. But how many of us have... - Devon Rex Cats
If you happen to be looking for a friendly, affectionate, intelligent, good-tempered and relatively maintenance free cat for a pet, you can't do much better than a... - Using an Architect
Perhaps you recognize the name of Frank Lloyd Wright, one of Americas greatest architects of the past. - Architectural Expert Witness
In todays society, there is a growing need for Architectural Expert Witnesses. What are they? And how do they serve the courts and the public?


